1. การเข้าสู่ระบบ
Logging In
ภาษาไทย
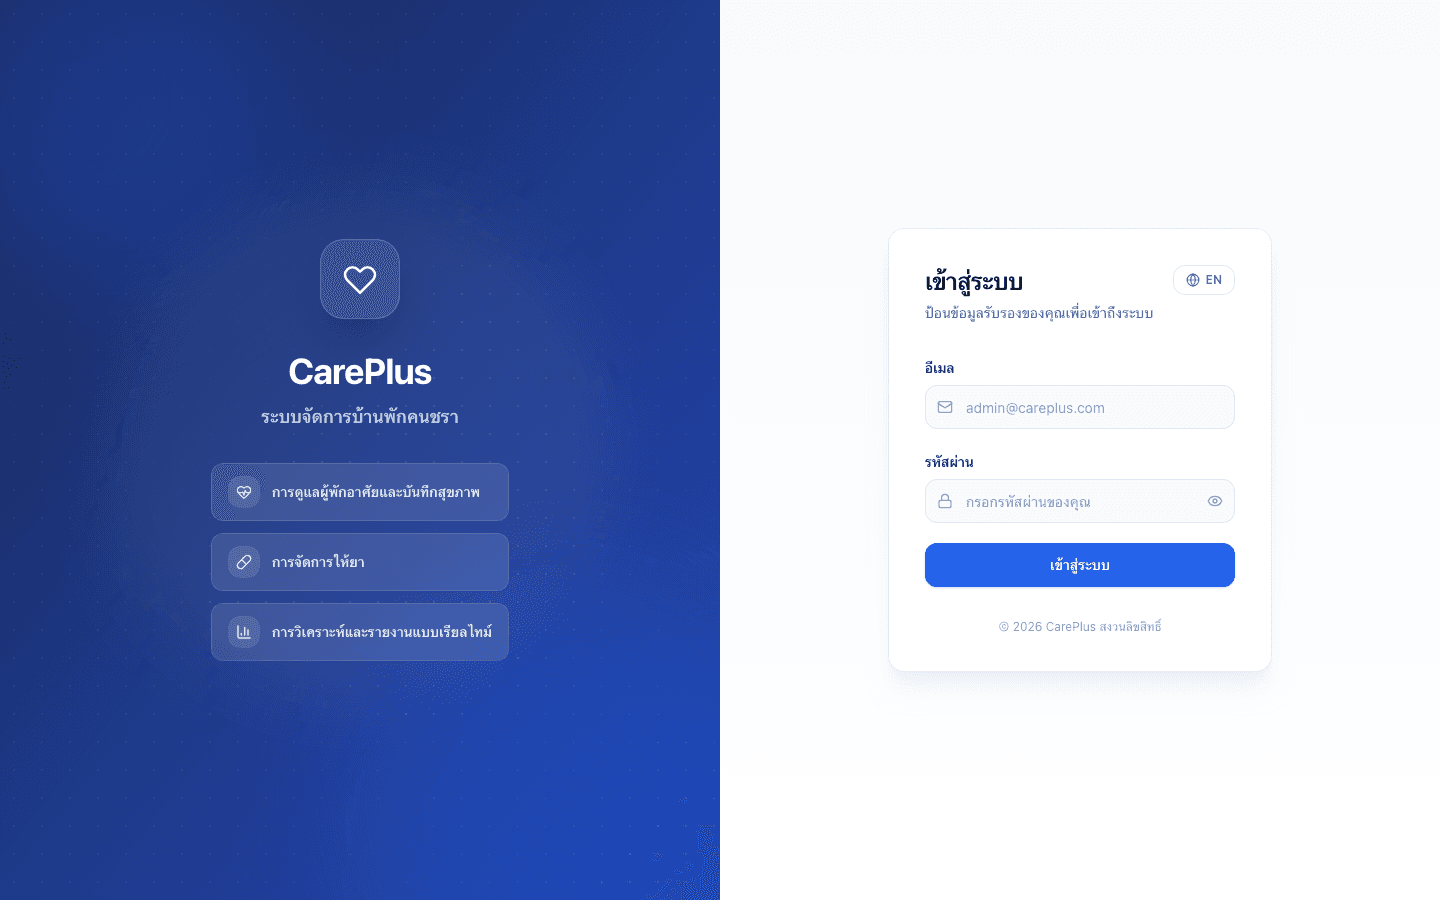
หน้าเข้าสู่ระบบของ CarePlus ช่วยให้ผู้ใช้ทุกบทบาทสามารถเข้าถึงระบบได้อย่างปลอดภัย รองรับทั้งภาษาไทยและภาษาอังกฤษ สามารถสลับภาษาได้จากปุ่มมุมบนขวาของแบบฟอร์ม
English
The CarePlus login page provides secure access for all user roles. Language can be switched between Thai and English using the toggle button at the top-right of the form.
ขั้นตอนการใช้งาน · Step-by-step
- 1
เปิดเบราว์เซอร์และไปที่ URL ของระบบ CarePlus
Open your browser and navigate to the CarePlus system URL.
- 2
กรอกอีเมลและรหัสผ่านที่ได้รับจากผู้ดูแลระบบ
Enter the email and password provided by your administrator.
- 3
กดปุ่ม "เข้าสู่ระบบ" เพื่อดำเนินการต่อ
Click the "Login" button to proceed.
- 4
หากลืมรหัสผ่าน ให้ติดต่อผู้ดูแลระบบ (ADMIN) เพื่อรีเซ็ต
If you forget your password, contact your ADMIN to reset it.
2. แดชบอร์ด
Dashboard
ภาษาไทย
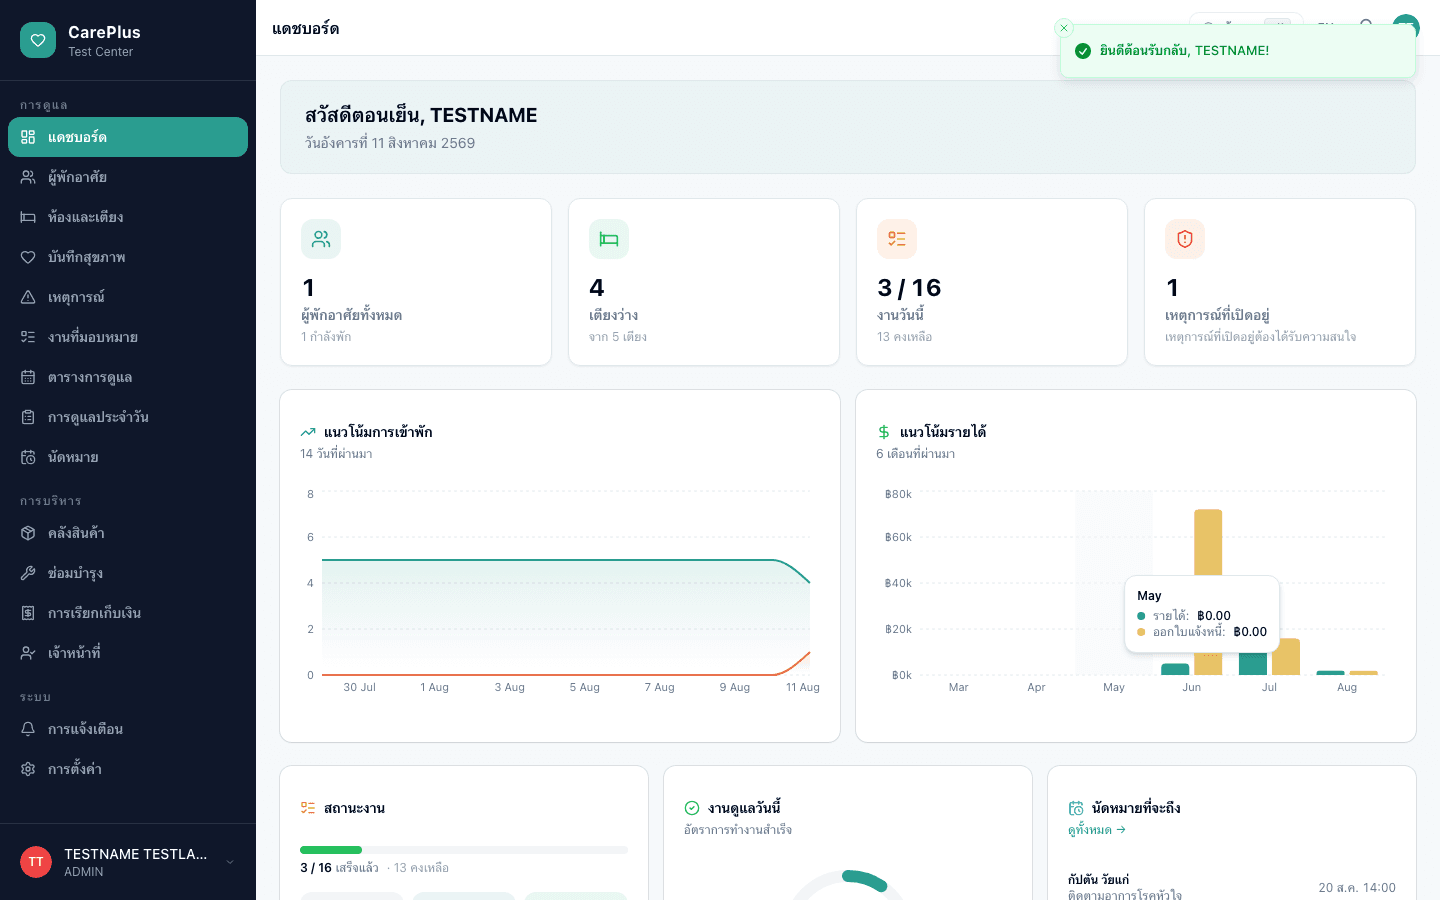
แดชบอร์ดคือหน้าหลักที่แสดงภาพรวมของสถานดูแล ประกอบด้วยตัวชี้วัดสำคัญ ได้แก่ จำนวนผู้พักอาศัย อัตราการใช้ห้อง งานที่รอดำเนินการ และแจ้งเตือนสต็อกสินค้าต่ำ รวมถึงกราฟแนวโน้มและสรุปเหตุการณ์เปิดอยู่
English
The dashboard is the main page showing a facility overview. It includes key metrics (total residents, occupancy rate, pending tasks, low stock alerts), trend charts, and a summary of open incidents and abnormal vitals.
ขั้นตอนการใช้งาน · Step-by-step
- 1
ดูการ์ดสถิติ 4 ใบที่แถวบนสุด ได้แก่ ผู้พักอาศัย ห้อง งาน และสต็อกต่ำ
Review the 4 KPI cards at the top: residents, occupancy, tasks, and low stock.
- 2
กราฟแนวโน้มการใช้ห้องและรายรับแสดงข้อมูลย้อนหลัง 30 วัน
Occupancy and revenue trend charts display the last 30 days of data.
- 3
ตรวจสอบส่วน "สัญญาณชีพผิดปกติ" เพื่อดูผู้พักอาศัยที่ต้องการความใส่ใจ
Check the "Abnormal Vitals" panel for residents needing attention.
- 4
ดูสรุปเหตุการณ์ที่ยังเปิดอยู่และสถานะงานในส่วนด้านล่าง
Review open incidents summary and task status breakdown at the bottom.
3. ผู้ช่วยเสียง AI
AI Voice Assistant
ภาษาไทย
ผู้ช่วยเสียง AI ให้คุณสั่งงานทั้งระบบด้วยเสียง แค่กดปุ่มไมค์ 🎤 ที่มุมขวาล่าง (มีอยู่ทุกหน้า) แล้วพูดภาษาไทยได้เลย เช่น เปิดหน้าต่างๆ, เปิดข้อมูลผู้พักอาศัยตามชื่อ หรือถามข้อมูลสดของศูนย์ (จำนวนผู้พักอาศัย เตียงว่าง นัดหมายวันนี้) ระบบจะพาไปยังหน้าที่ต้องการและอ่านคำตอบกลับด้วยเสียง เสียงพูดถูกถอดเป็นข้อความในเบราว์เซอร์ (ส่งเฉพาะข้อความ ไม่ส่งไฟล์เสียง) และผู้ช่วยเห็นเฉพาะข้อมูลศูนย์ของคุณเท่านั้น
English
The AI Voice Assistant lets you control the whole app hands-free. Tap the mic 🎤 button at the bottom-right (available on every page) and speak in Thai or English — open any page, open a resident by name, or ask questions answered from live center data (resident count, free beds, today's appointments). It navigates for you and reads the answer aloud. Speech is transcribed in-browser (only text is sent, never audio), and the assistant only sees your own center's data.
ขั้นตอนการใช้งาน · Step-by-step
- 1
กดปุ่มไมค์ 🎤 ที่มุมขวาล่าง (แสดงเฉพาะเบราว์เซอร์ที่รองรับ เช่น Chrome/Edge และเมื่อเปิดใช้งาน AI) — ครั้งแรกให้กด "อนุญาต" การใช้ไมโครโฟน
Tap the 🎤 mic button at the bottom-right (shown only on supported browsers like Chrome/Edge and when AI is enabled) — allow microphone access on first use.
- 2
พูดคำสั่งเปิดหน้า เช่น "เปิดหน้าผู้พักอาศัย", "ไปหน้าการเงิน", "เปิดตารางการดูแล" — ระบบจะพาไปให้ทันที
Say a navigation command like "Open residents", "Go to billing", "Open the care schedule" — it navigates instantly.
- 3
เปิดข้อมูลผู้พักอาศัยตามชื่อ เช่น "เปิดข้อมูลคุณสุมาลี" ระบบจะค้นหาและเปิดโปรไฟล์ให้ (จับคู่ชื่อได้แม้พูดไม่ครบ)
Open a resident by name, e.g. "Open Sumalee's profile" — it finds and opens the profile (tolerant of partial names).
- 4
ถามข้อมูลสดของศูนย์ เช่น "มีผู้พักอาศัยกี่คน", "เตียงว่างกี่เตียง", "วันนี้มีนัดหมายกี่คน" ระบบจะตอบและอ่านออกเสียง
Ask live questions like "How many residents?", "How many free beds?", "How many appointments today?" — it answers and reads it aloud.
- 5
ผู้ช่วยไม่แก้ไขข้อมูลโดยตรง คำสั่งประเภท "สร้าง/บันทึก" จะพาไปยังหน้าฟอร์มให้เจ้าหน้าที่ตรวจทานและกดบันทึกเอง
The assistant never edits data directly — "create/save" phrasing routes you to the relevant form to review and save yourself.
4. ข้อมูลผู้พักอาศัย
Residents
ภาษาไทย
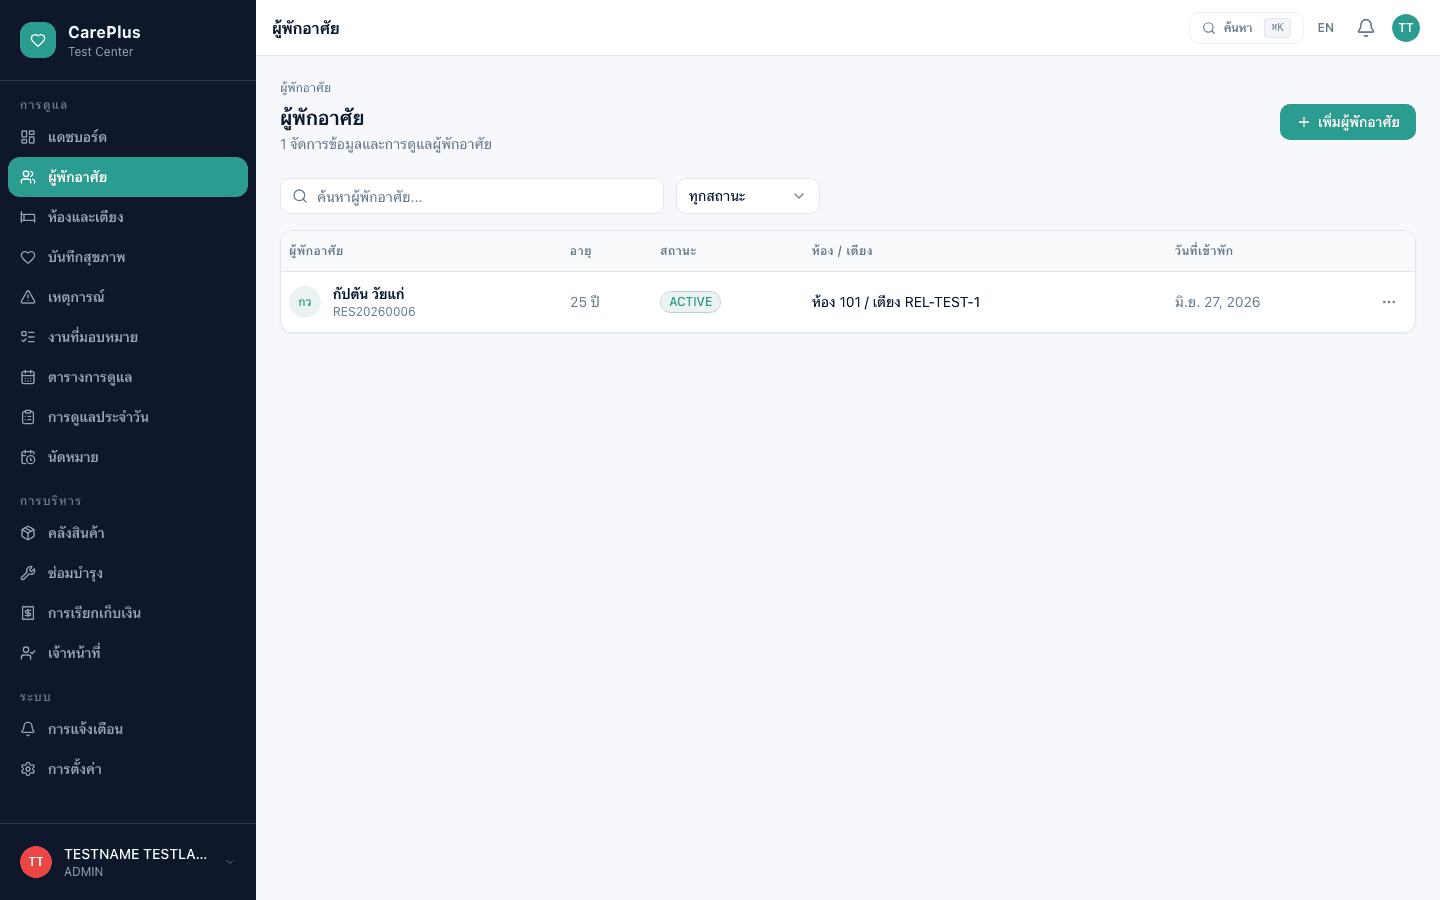
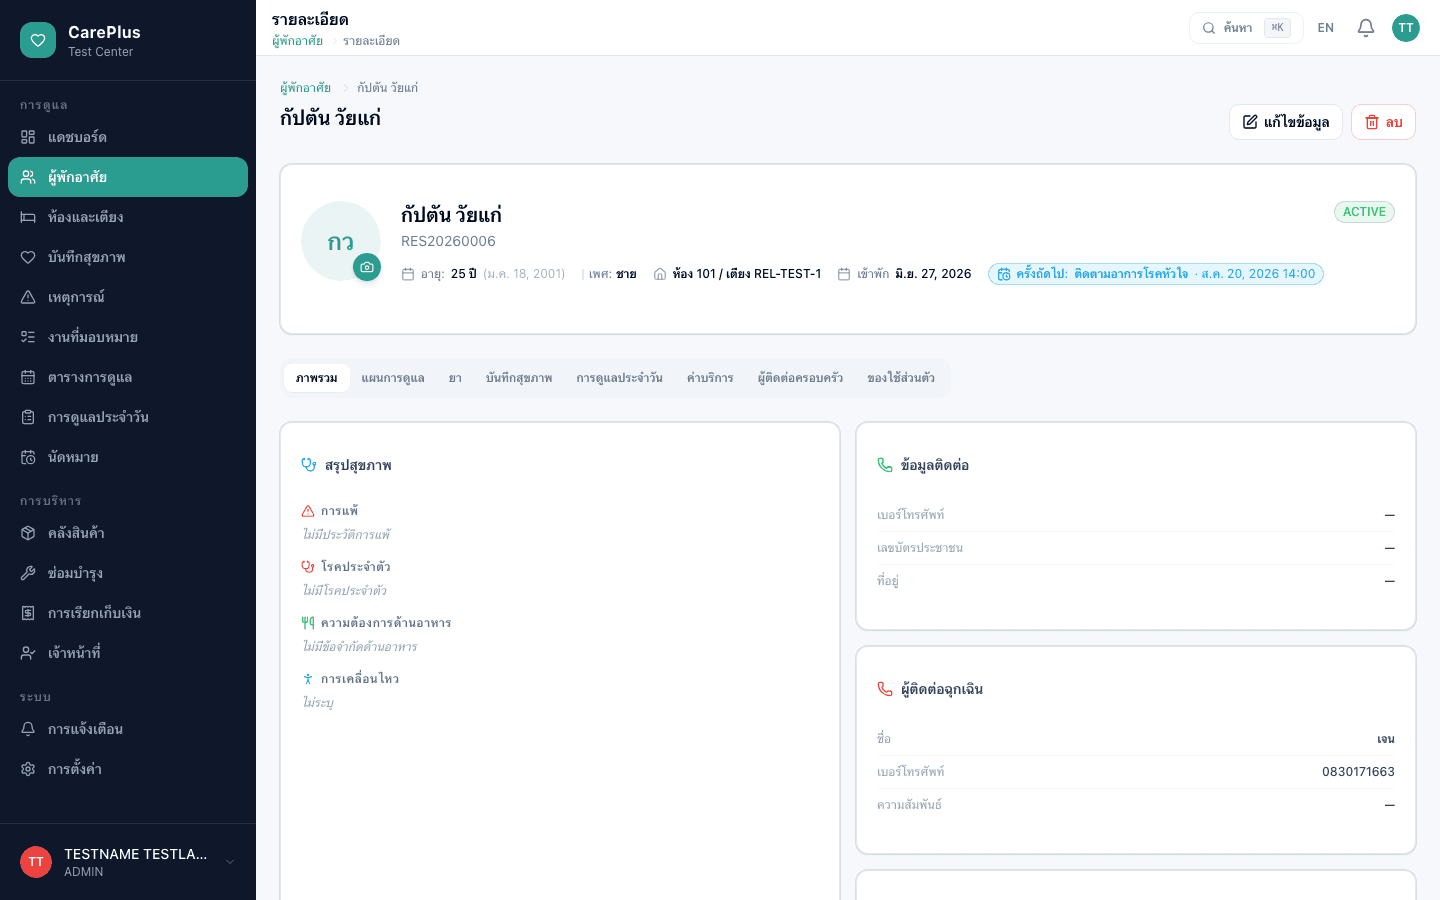
โมดูลผู้พักอาศัยจัดการข้อมูลทั้งหมดของผู้พักในสถานดูแล ตั้งแต่ข้อมูลส่วนตัว สถานะการพัก ห้องที่พัก ไปจนถึงประวัติการรักษาและแผนการดูแล สามารถกรองตามสถานะได้หลายประเภท
English
The Residents module manages all resident information, from personal details and admission status to room assignments, health history, and care plans. Residents can be filtered by status.
ขั้นตอนการใช้งาน · Step-by-step
- 1
ใช้แถบค้นหาเพื่อค้นหาผู้พักอาศัยตามชื่อ
Use the search bar to find residents by name.
- 2
กรองตามสถานะ: กำลังพัก / ออกไปข้างนอก / โรงพยาบาล / โอนย้าย / จำหน่าย / เสียชีวิต
Filter by status: Active / Away / Hospital / Transferred / Discharged / Deceased.
- 3
คลิกชื่อผู้พักอาศัยเพื่อดูโปรไฟล์ละเอียด รวมถึงยา บันทึกสุขภาพ และการเรียกเก็บเงิน
Click a resident name to view their detailed profile including medications, health records, and billing.
- 4
กดปุ่ม "+ เพิ่มผู้พักอาศัย" เพื่อลงทะเบียนผู้พักอาศัยรายใหม่ (ADMIN / MANAGER เท่านั้น)
Click "+ Add Resident" to register a new resident (ADMIN / MANAGER only).
5. ห้องและเตียง
Rooms & Beds
ภาษาไทย
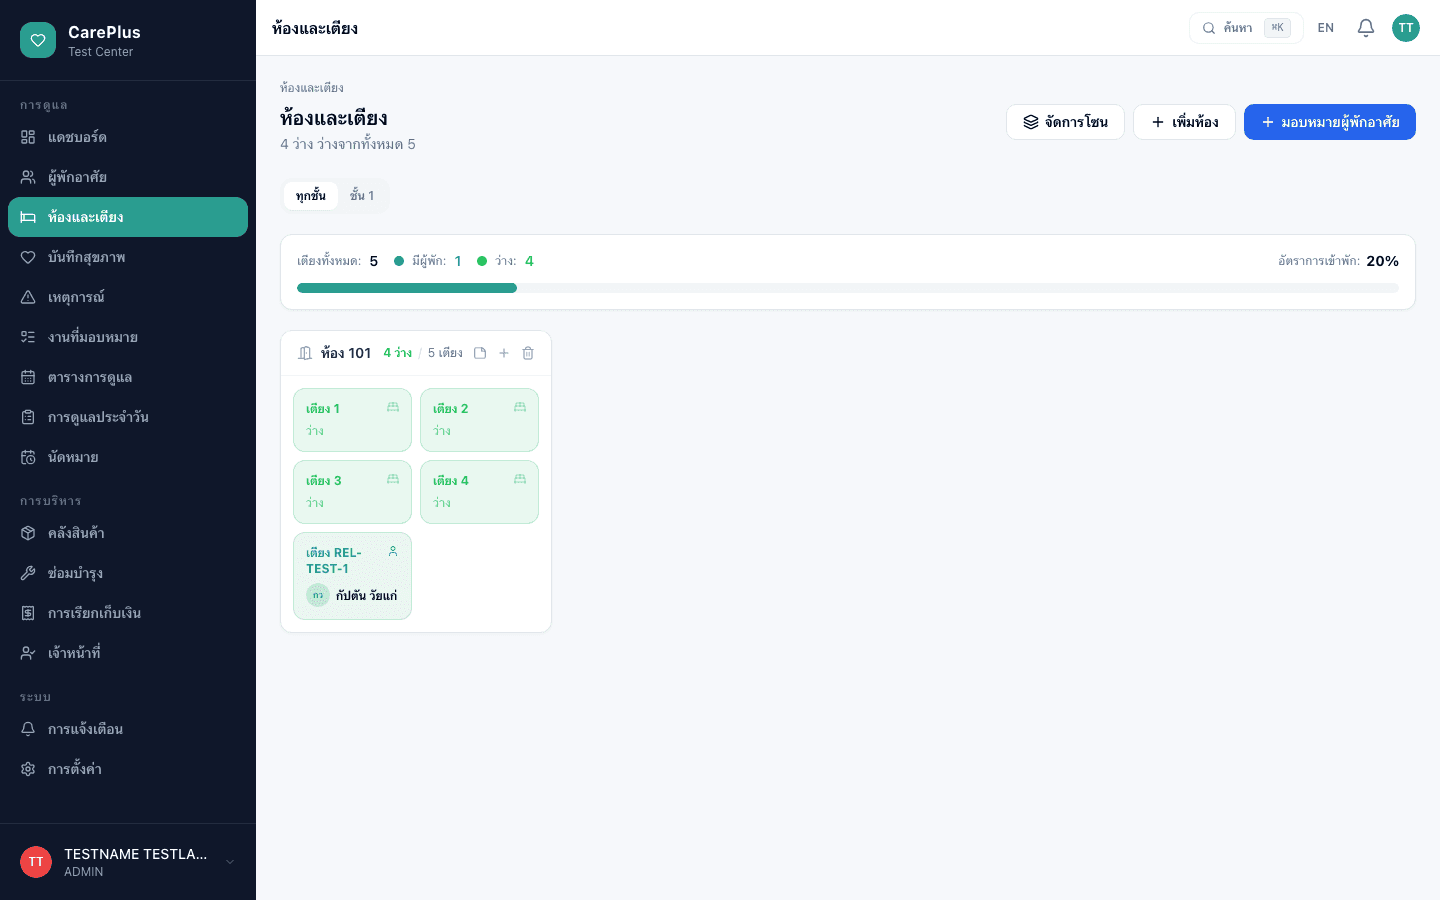
โมดูลห้องและเตียงแสดงผังห้องทั้งหมดของสถานดูแล แบ่งตามชั้น สามารถดูสถานะเตียงแต่ละใบได้แบบเรียลไทม์ และจัดการการมอบหมายผู้พักอาศัยให้กับเตียงได้โดยตรง
English
The Rooms & Beds module shows the complete room layout organized by floor. Bed statuses are displayed in real-time, and residents can be assigned or moved directly from this view.
ขั้นตอนการใช้งาน · Step-by-step
- 1
เลือกชั้นที่ต้องการดูจากแท็บด้านบน
Select the floor you want to view from the tabs at the top.
- 2
แถบสรุปด้านบนแสดงจำนวนเตียงทั้งหมด เตียงที่มีผู้พัก เตียงว่าง และอัตราการเข้าพัก
The summary bar shows total beds, occupied, available, and occupancy rate.
- 3
สีของการ์ดเตียงบ่งบอกสถานะ: เขียว=ว่าง, เขียวเข้ม(teal)=มีผู้พัก(แสดงชื่อ), เหลือง=ทำความสะอาด, แดง=บำรุงรักษา
Card colors indicate status: green=available, teal=occupied (shows resident), yellow=cleaning, red=maintenance.
- 4
คลิกเตียงที่ว่างเพื่อมอบหมายผู้พักอาศัย
Click an available bed to assign a resident.
- 5
ADMIN สามารถเพิ่มห้อง แก้ไขห้อง และจัดการโซน/ชั้นได้จากปุ่มด้านบนขวา
ADMIN can add rooms, edit rooms, and manage zones/floors from the top-right buttons.
6. ตารางการดูแล
Care Schedule
ภาษาไทย
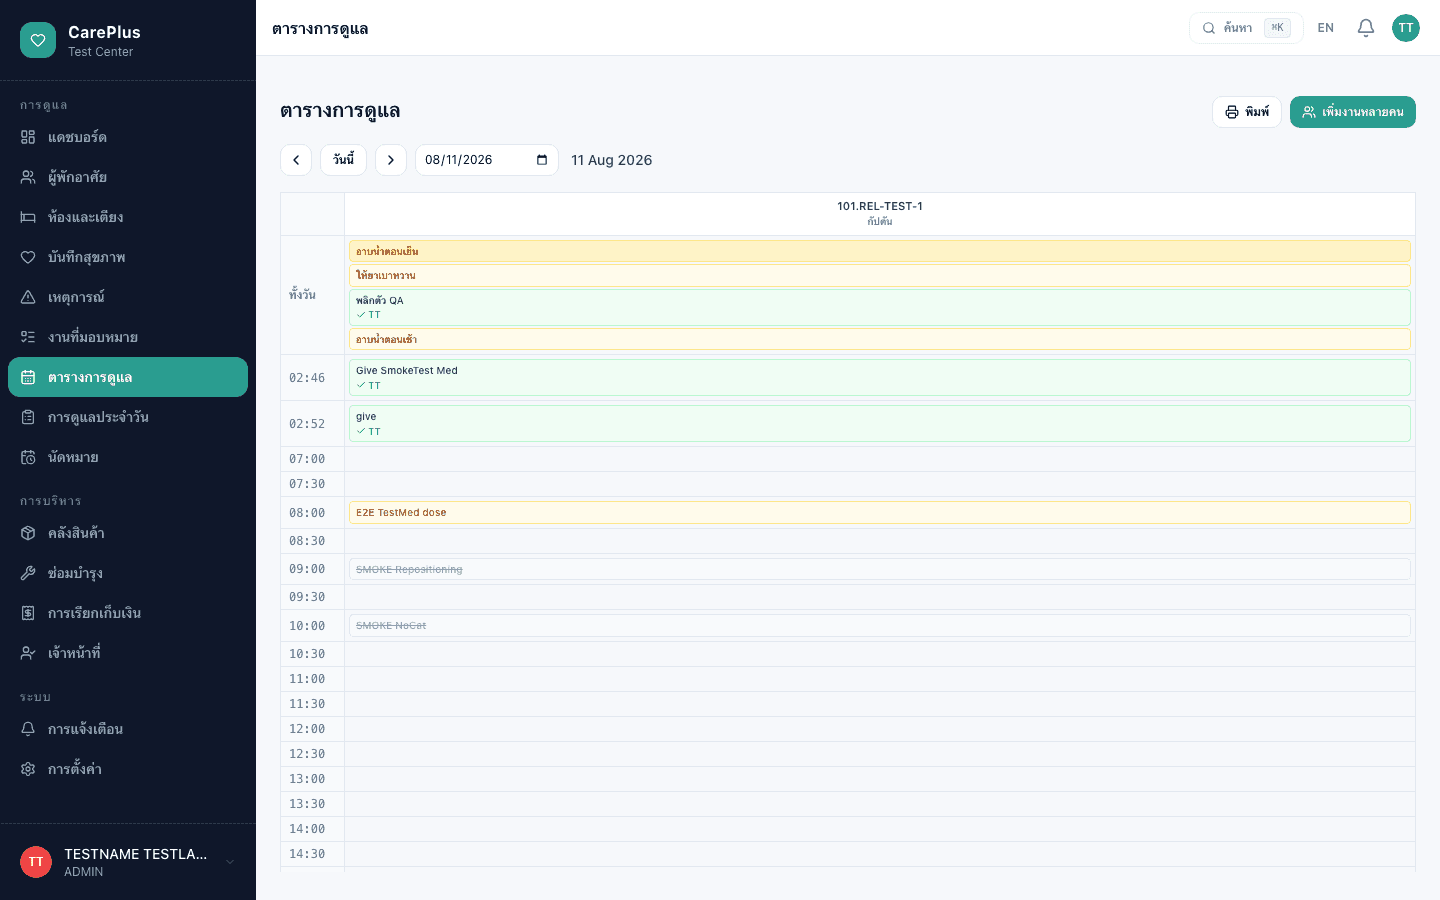
ตารางการดูแลแสดงงานดูแลประจำวันในรูปแบบ Grid (ผู้พักอาศัย × ช่วงเวลา) เจ้าหน้าที่ติ๊กงานเสร็จได้รวดเร็ว มอบหมายทีละหลายคน และพิมพ์เป็นตารางเวร A4 ได้ งานที่ตั้งเป็น "ทั้งวัน" จะอยู่แถวบนสุด
English
The Care Schedule shows daily care tasks in a grid (residents × time slots). Staff can quick-complete tasks, bulk-apply to many residents, and print an A4 shift roster. "Any-time" tasks appear in the top row.
ขั้นตอนการใช้งาน · Step-by-step
- 1
เลือกวันที่จากปุ่มด้านบน หรือกด "วันนี้" เพื่อกลับมาวันปัจจุบัน
Pick a date from the top controls, or click "Today" to return to the current day.
- 2
คลิกงานในช่องเพื่อติ๊กว่าเสร็จ หรือระบุว่าทำไม่ได้พร้อมเหตุผล
Click a task cell to mark it complete, or record it as unable-to-complete with a reason.
- 3
เมื่อทำงานหมวดที่ผูกกับ Daily Care เสร็จ ระบบจะเด้งให้บันทึกรายละเอียดต่อได้
Completing a task linked to a Daily Care category prompts you to log the structured detail.
- 4
กด "มอบหมายหลายคน" เพื่อสร้างงานให้ผู้พักอาศัยหลายคนพร้อมกัน และ "พิมพ์" เพื่อออกตารางเวร
Use "Bulk Apply" to assign a task to many residents, and "Print" for a shift roster.
7. การดูแลประจำวัน (Daily Care)
Daily Care Records
ภาษาไทย
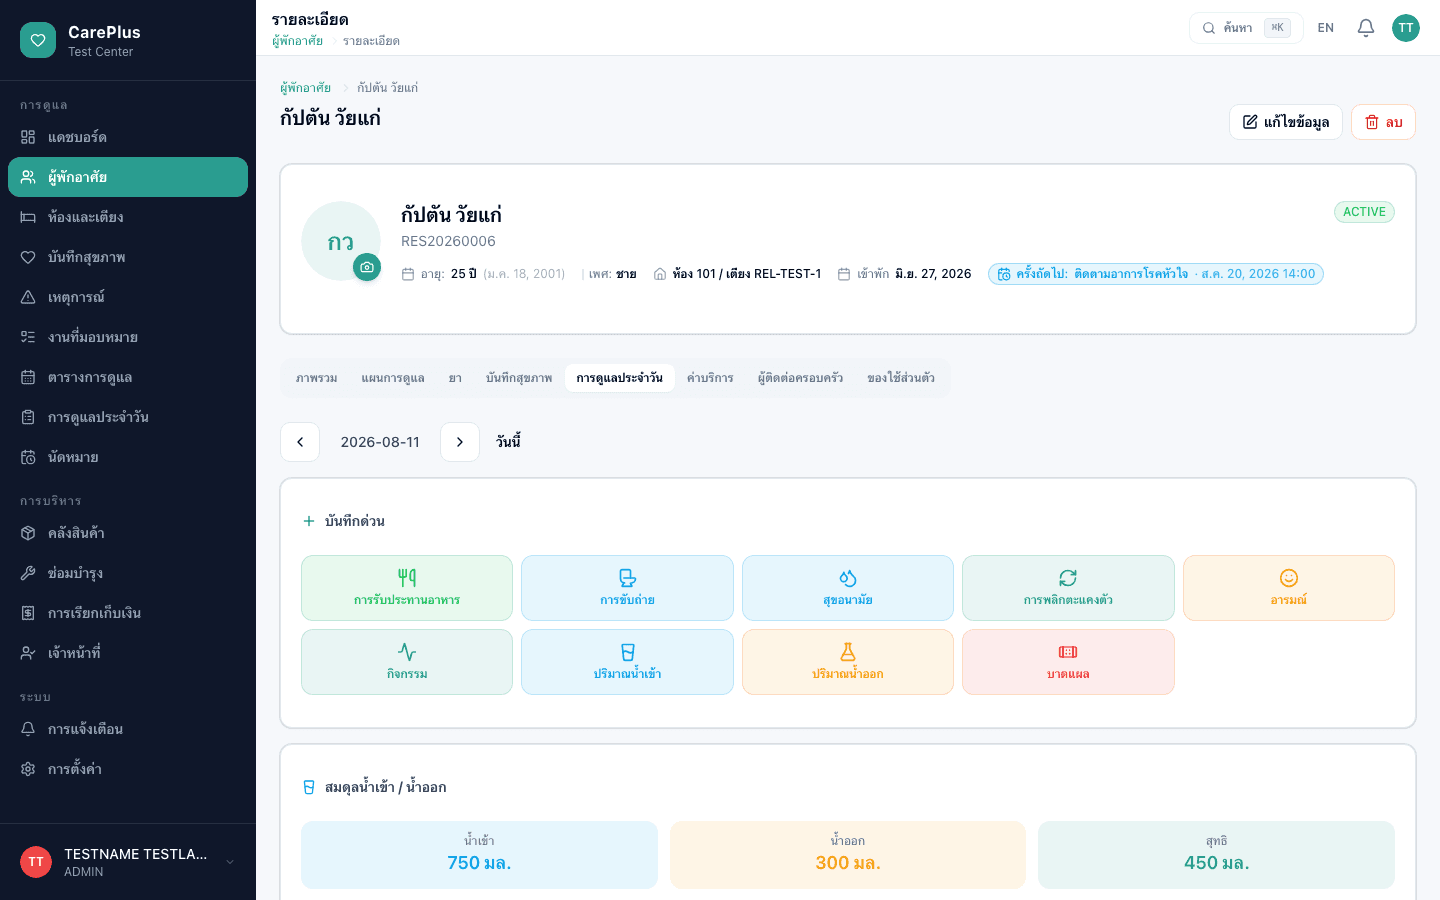
โมดูลการดูแลประจำวันบันทึกกิจกรรมการดูแลแบบมีโครงสร้าง 9 หมวด ได้แก่ ทานอาหาร ขับถ่าย สุขอนามัย พลิกตัว อารมณ์ กิจกรรม น้ำเข้า น้ำออก และแผลกดทับ พร้อมคำนวณสมดุลน้ำ (I/O) อัตโนมัติ และบันทึกได้ด้วยเสียง/รูปภาพผ่าน AI
English
The Daily Care module records structured care activities across 9 categories (eating, toileting, hygiene, repositioning, mood, activity, intake, output, wound), auto-calculates the I/O balance, and supports voice/photo entry via AI.
ขั้นตอนการใช้งาน · Step-by-step
- 1
เข้าเมนู "การดูแลประจำวัน" หรือแท็บใต้โปรไฟล์ผู้พักอาศัย แล้วเลือกผู้พักอาศัยและวันที่
Open "Daily Care" (or the tab in a resident profile), then pick a resident and date.
- 2
กดปุ่มหมวดสีต่างๆ เพื่อบันทึกอย่างรวดเร็ว เช่น น้ำเข้า/ออก แผลกดทับ (ระบุระดับ 1–4)
Tap a colored category button for quick logging, e.g. intake/output or wound (Stage 1–4).
- 3
การ์ด "สมดุลน้ำเข้า/ออก" แสดงยอดรวมน้ำเข้า น้ำออก และสุทธิของวันโดยอัตโนมัติ
The "Intake/Output balance" card auto-shows total intake, output, and net for the day.
- 4
ปุ่ม 🎤 พูด และ 📷 สแกน ช่วยให้ AI กรอกข้อมูลให้ (ตรวจทานก่อนบันทึกเสมอ)
The 🎤 Speak and 📷 Scan buttons let AI fill the form for you (always review before saving).
8. ยาและการบริหารยา (eMAR)
Medications & eMAR
ภาษาไทย
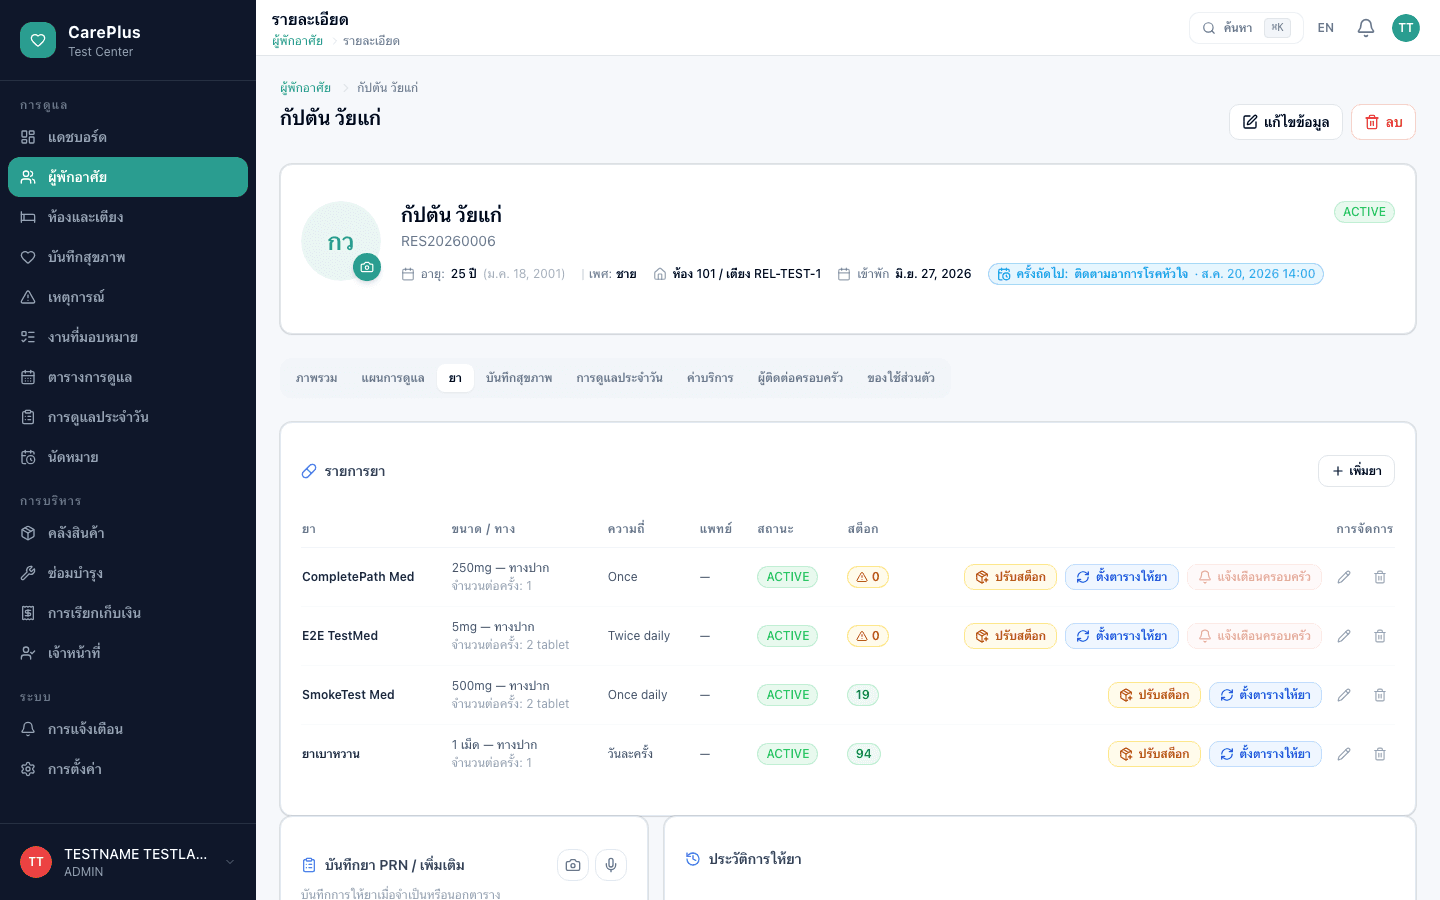
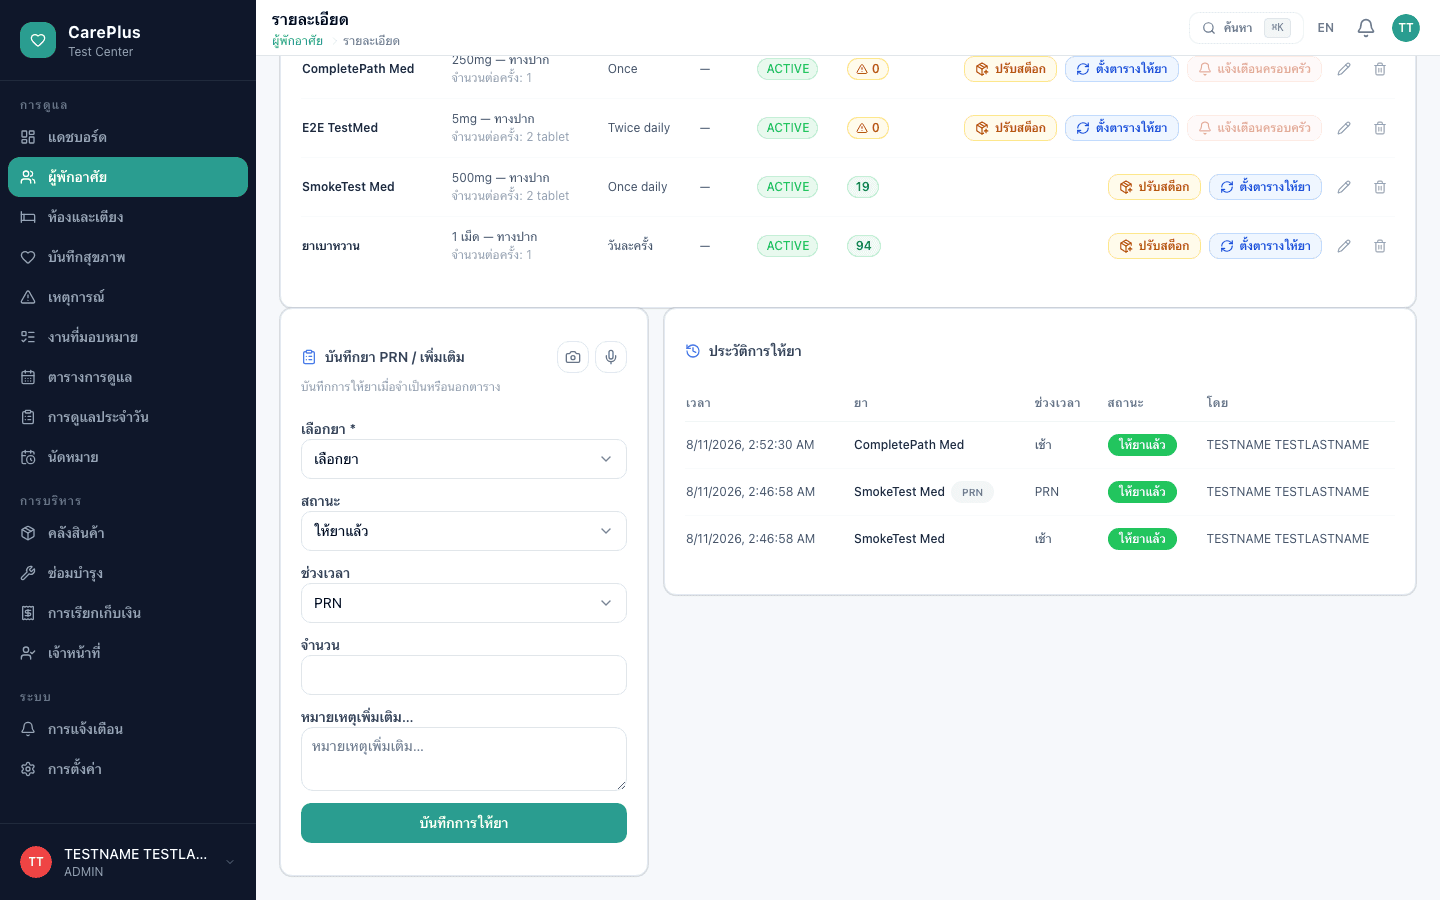
โมดูลยาอยู่ในแท็บ "ยา" ของโปรไฟล์ผู้พักอาศัย จัดการรายการยา (ชื่อ ขนาด ความถี่ ประเภท เม็ด/น้ำ/ผง/ฉีด) พร้อมระบบบันทึกการให้ยา (eMAR) ที่ตรวจสอบย้อนหลังได้ เชื่อมกับสต็อกยา และบันทึกยา PRN ได้
English
The Medications module lives in the resident profile "Medications" tab. It manages the drug list (name, dose, frequency, type: tablet/liquid/powder/injection) alongside an auditable eMAR that links to drug stock and supports PRN (as-needed) dosing.
ขั้นตอนการใช้งาน · Step-by-step
- 1
เปิดโปรไฟล์ผู้พักอาศัย แล้วกดแท็บ "ยา" เพื่อดูรายการยาที่ใช้อยู่
Open a resident profile and click the "Medications" tab to view active medications.
- 2
ส่วน "ประวัติการให้ยา" แสดงว่ายาถูกให้เมื่อไหร่ ช่วงเวลาใด และสถานะ (ให้แล้ว/งด/ปฏิเสธ)
The "Administration History" shows when each dose was given, its slot, and status (given/withheld/refused).
- 3
ใช้ฟอร์ม "บันทึกยา PRN" เพื่อบันทึกการให้ยาตามอาการ พร้อมหักสต็อกอัตโนมัติ
Use the "Record PRN Dose" form to log as-needed administrations, with automatic stock deduction.
- 4
ปุ่ม 🎤/📷 ช่วยให้ AI กรอกข้อมูลการให้ยาให้ (ตรวจทานก่อนบันทึก)
The 🎤/📷 buttons let AI fill the administration form for you (review before saving).
9. บันทึกสุขภาพ
Health Records
ภาษาไทย
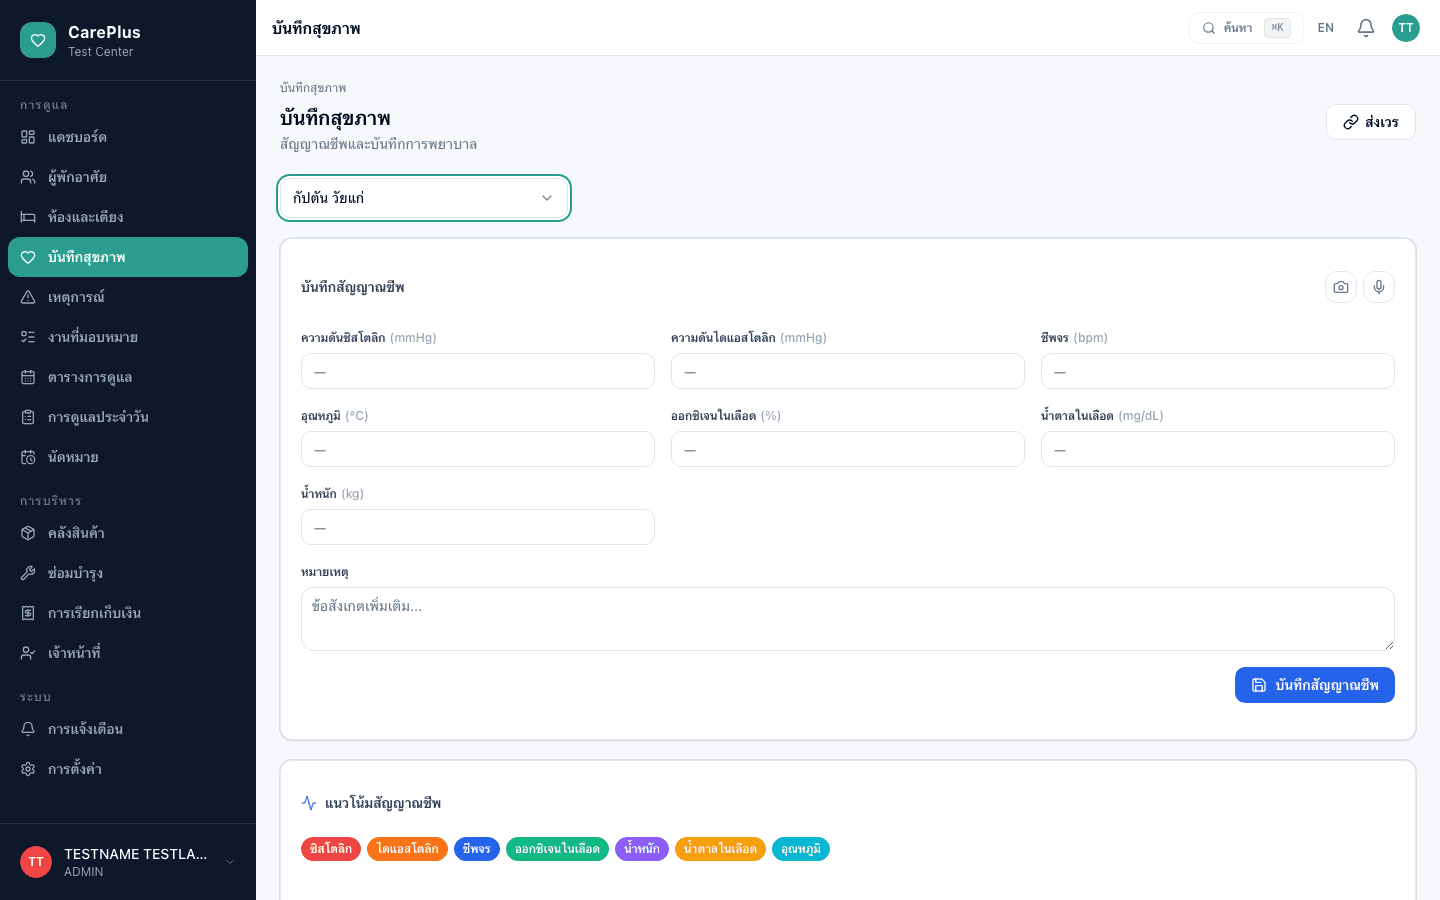
โมดูลบันทึกสุขภาพใช้บันทึกสัญญาณชีพ (ความดัน ชีพจร อุณหภูมิ ออกซิเจน น้ำตาลในเลือด น้ำหนัก) พร้อมกราฟแนวโน้มและกราฟน้ำหนัก เมื่อยังไม่เลือกผู้พักอาศัยจะแสดงรายการค่าผิดปกติทั้งศูนย์ และรองรับการกรอกด้วยเสียง/รูปภาพผ่าน AI
English
The Health Records module records vital signs (BP, pulse, temperature, oxygen, blood sugar, weight) with trend and weight charts. Before selecting a resident it shows center-wide abnormal vitals, and it supports voice/photo entry via AI.
ขั้นตอนการใช้งาน · Step-by-step
- 1
หน้าเริ่มต้นแสดง "ค่าสัญญาณชีพผิดปกติทั้งศูนย์" ใน 48 ชั่วโมงล่าสุด
The default view shows center-wide abnormal vitals from the last 48 hours.
- 2
เลือกผู้พักอาศัยเพื่อดูฟอร์มบันทึก กราฟแนวโน้ม และกราฟน้ำหนัก
Select a resident to view the entry form, trend chart, and weight chart.
- 3
ใช้ปุ่ม 🎤 พูด หรือ 📷 สแกน (ถ่ายจอเครื่องวัด) ให้ AI กรอกค่าให้ ตรวจแล้วกดบันทึก
Use 🎤 Speak or 📷 Scan (photo of a monitor) to let AI fill the values — review, then save.
- 4
บันทึกการพยาบาลด้านล่าง และกด "ส่งเวร" เพื่อสร้างเอกสารส่งเปลี่ยนเวร
Add nursing notes below, and click "Handover" to create a shift handover document.
10. นัดหมาย
Appointments
ภาษาไทย
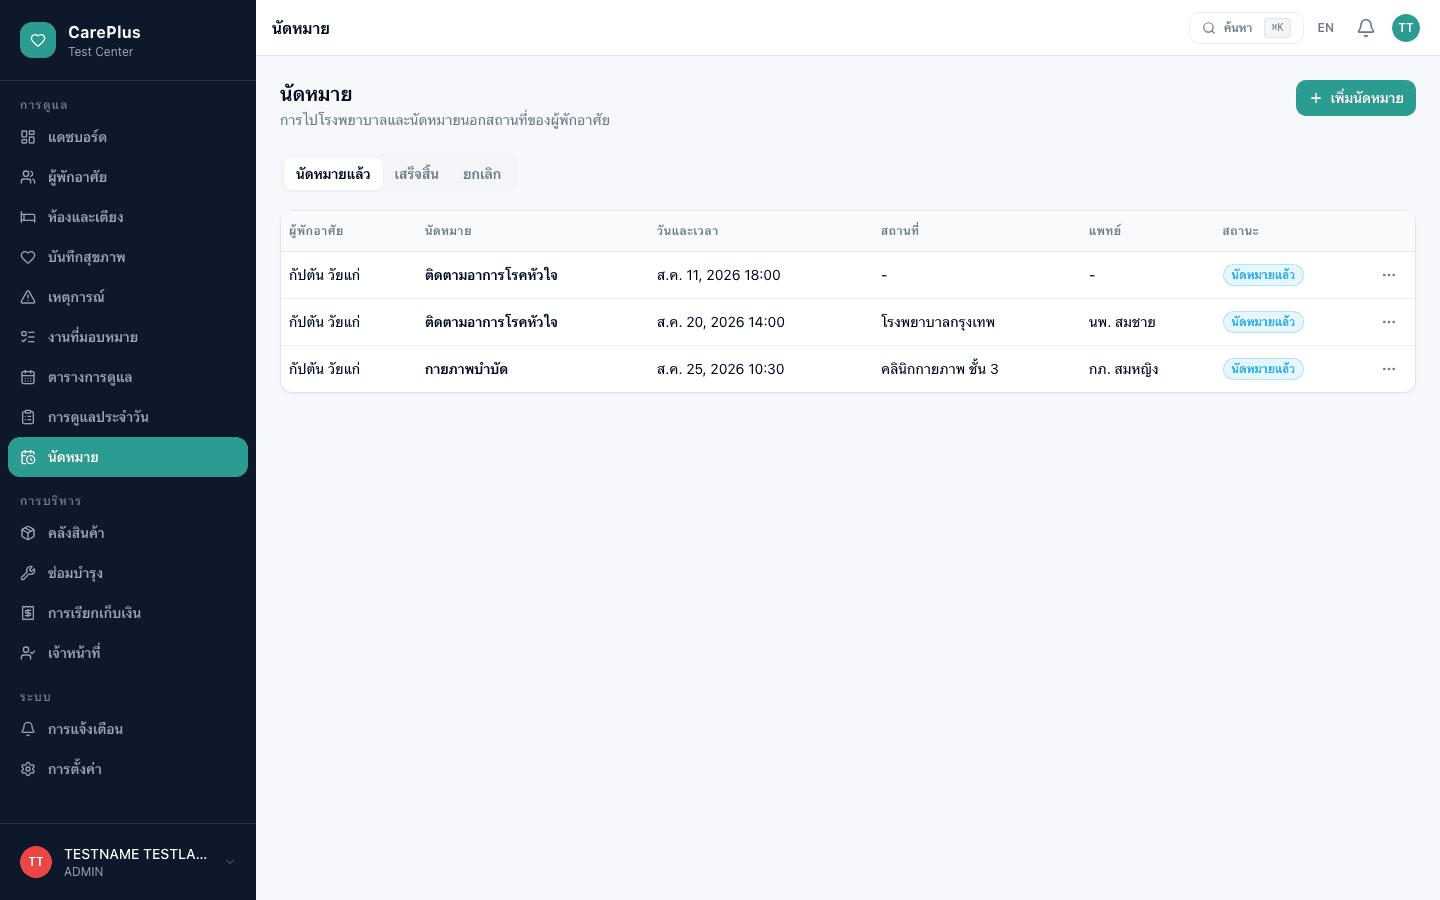
โมดูลนัดหมายบันทึกการนัดหมายของผู้พักอาศัย เช่น การไปโรงพยาบาลหรือพบแพทย์ ระบุหัวข้อ วันเวลา โรงพยาบาล/สถานที่ และแพทย์ พร้อมระบบแจ้งเตือนล่วงหน้าอัตโนมัติ และแสดงนัดหมายที่จะถึงบนแดชบอร์ดและโปรไฟล์ผู้พักอาศัย
English
The Appointments module records resident appointments (hospital visits, doctor consultations) with title, date/time, hospital/location, and doctor. It sends automatic reminders and surfaces upcoming appointments on the dashboard and resident profile.
ขั้นตอนการใช้งาน · Step-by-step
- 1
กดปุ่ม "เพิ่มนัดหมาย" แล้วเลือกผู้พักอาศัย กรอกหัวข้อ วันเวลา โรงพยาบาล และแพทย์
Click "New Appointment", choose a resident, and fill in the title, date/time, hospital, and doctor.
- 2
สลับแท็บดูตามสถานะ: นัดหมายแล้ว / เสร็จสิ้น / ยกเลิก
Switch tabs to view by status: Scheduled / Completed / Cancelled.
- 3
ระบบแจ้งเตือนล่วงหน้า 24 ชั่วโมงก่อนถึงนัด ให้เจ้าหน้าที่ในศูนย์
The system notifies center staff 24 hours before each appointment.
- 4
ทำเครื่องหมาย "เสร็จสิ้น" หรือ "ยกเลิก" ได้จากเมนูของแต่ละรายการ (ADMIN ลบได้)
Mark an appointment "Completed" or "Cancelled" from its row menu (ADMIN can delete).
11. เหตุการณ์ / รายงานเหตุ
Incidents
ภาษาไทย
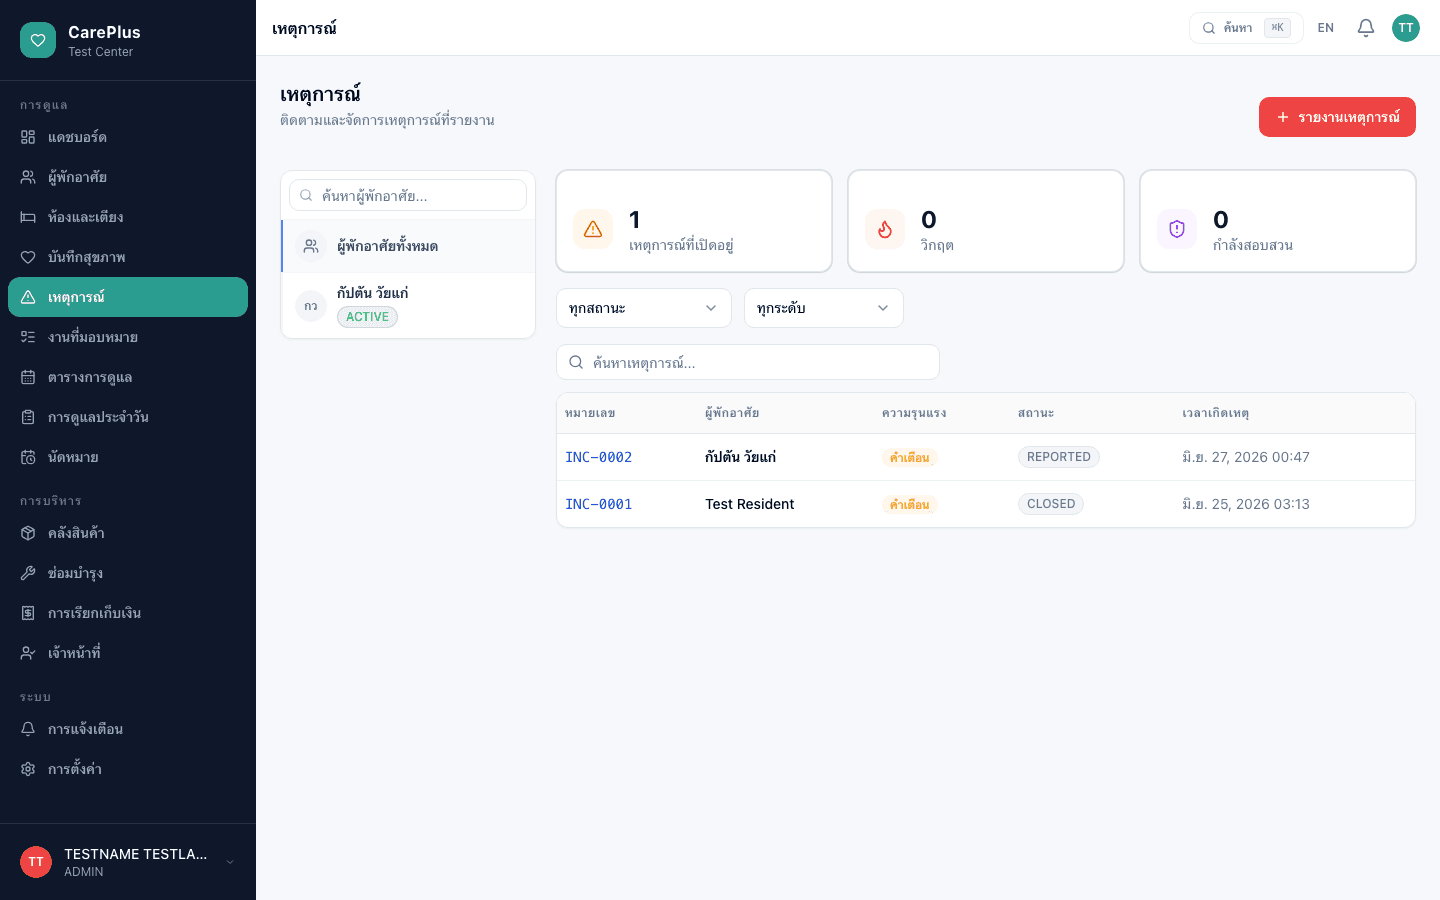
โมดูลเหตุการณ์ใช้สำหรับรายงานและติดตามเหตุการณ์ด้านความปลอดภัยภายในสถานดูแล เช่น การหกล้ม เหตุฉุกเฉิน หรือเหตุการณ์ที่เกือบเกิดขึ้น พร้อมระบบติดตามสถานะตั้งแต่รับแจ้งจนกระทั่งปิดเคส
English
The Incidents module reports and tracks safety events within the facility, such as falls, emergencies, or near-misses, with a status lifecycle from reported to closed.
ขั้นตอนการใช้งาน · Step-by-step
- 1
กดปุ่ม "+ รายงานเหตุการณ์" เพื่อบันทึกเหตุการณ์ใหม่
Click "+ Report Incident" to log a new incident.
- 2
เลือกระดับความรุนแรง: ข้อมูล / คำเตือน / เร่งด่วน / วิกฤต
Select severity: Info / Warning / Urgent / Critical.
- 3
ติดตามสถานะ: รับแจ้ง → กำลังสืบสวน → มอบหมายการดำเนินการ → ติดตามผล → ปิดเคส
Track status: Reported → Investigating → Action Assigned → Follow-Up → Closed.
- 4
กรองเหตุการณ์ตามผู้พักอาศัยหรือสถานะจากแถบด้านซ้าย
Filter incidents by resident or status from the left sidebar.
12. ภารกิจดูแลผู้พักอาศัย
Staff Tasks
ภาษาไทย
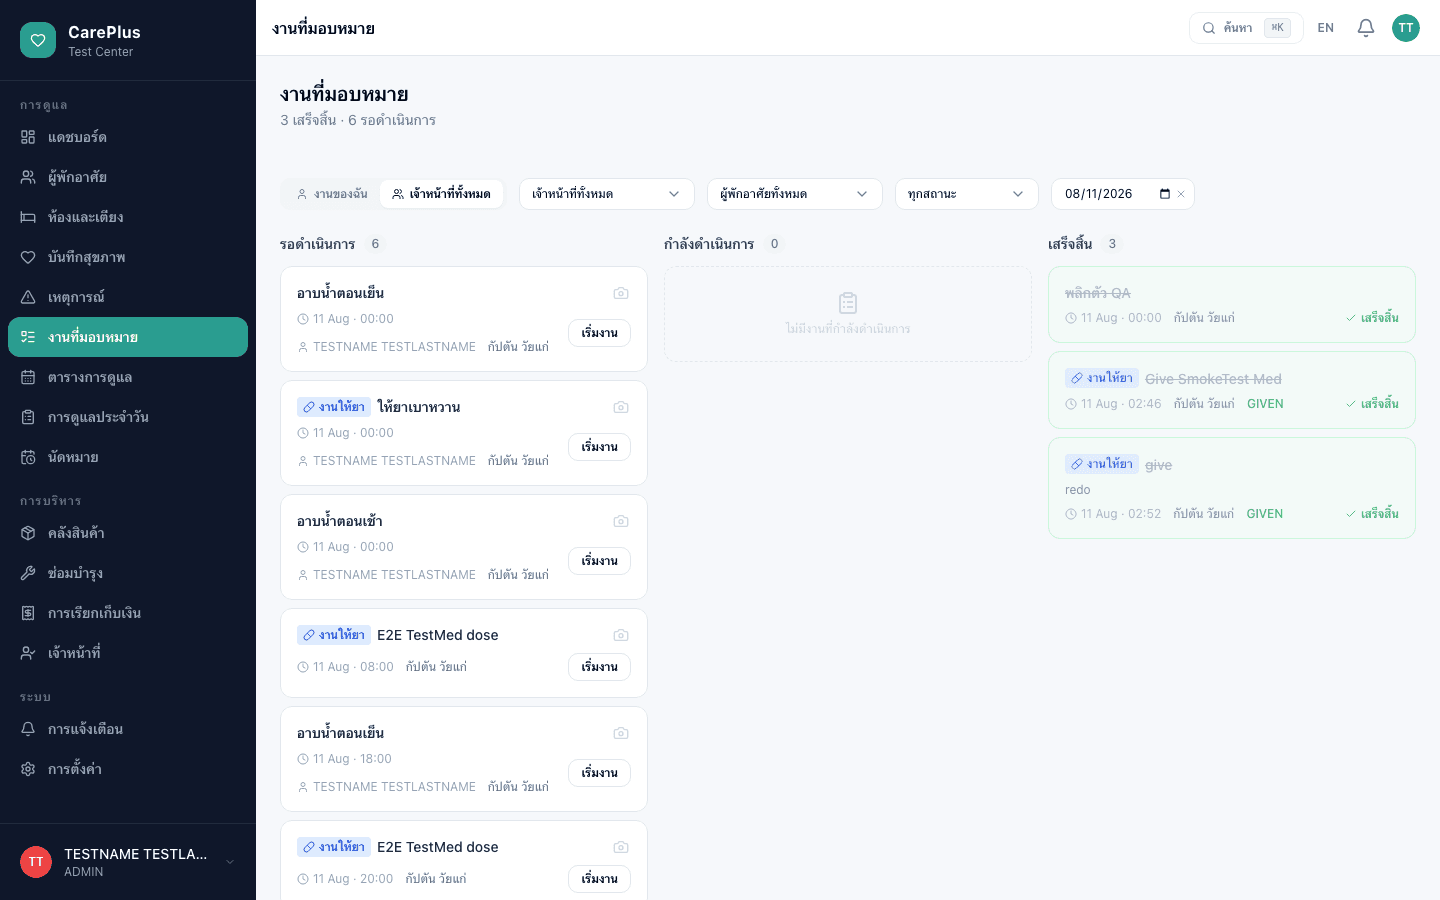
โมดูลภารกิจดูแลใช้สำหรับมอบหมายและติดตามงานดูแลผู้พักอาศัย แสดงงานในรูปแบบคอลัมน์สถานะ (รอดำเนินการ / กำลังดำเนินการ / เสร็จสิ้น) ช่วยให้ผู้ดูแลระบบสามารถติดตามความคืบหน้าได้แบบเรียลไทม์
English
The Staff Tasks module assigns and tracks care tasks for residents in status columns (Pending / In Progress / Completed), giving supervisors real-time visibility into task progress.
ขั้นตอนการใช้งาน · Step-by-step
- 1
ดูงานทั้งหมดในคอลัมน์ "รอดำเนินการ", "กำลังดำเนินการ" และ "เสร็จสิ้น"
View all tasks in the Pending, In Progress, and Completed columns.
- 2
กรองงานตามผู้รับผิดชอบ วันที่ หรือสถานะ
Filter tasks by assignee, date, or status.
- 3
กดปุ่ม "+ สร้างภารกิจ" เพื่อสร้างงานใหม่และมอบหมายให้พนักงาน (ADMIN/MANAGER)
Click "+ Create Task" to create and assign a new task (ADMIN/MANAGER only).
- 4
คลิกภารกิจเพื่ออัปเดตสถานะหรือเพิ่มบันทึก
Click a task to update its status or add notes.
13. การจัดการพนักงาน
Staff Management
ภาษาไทย
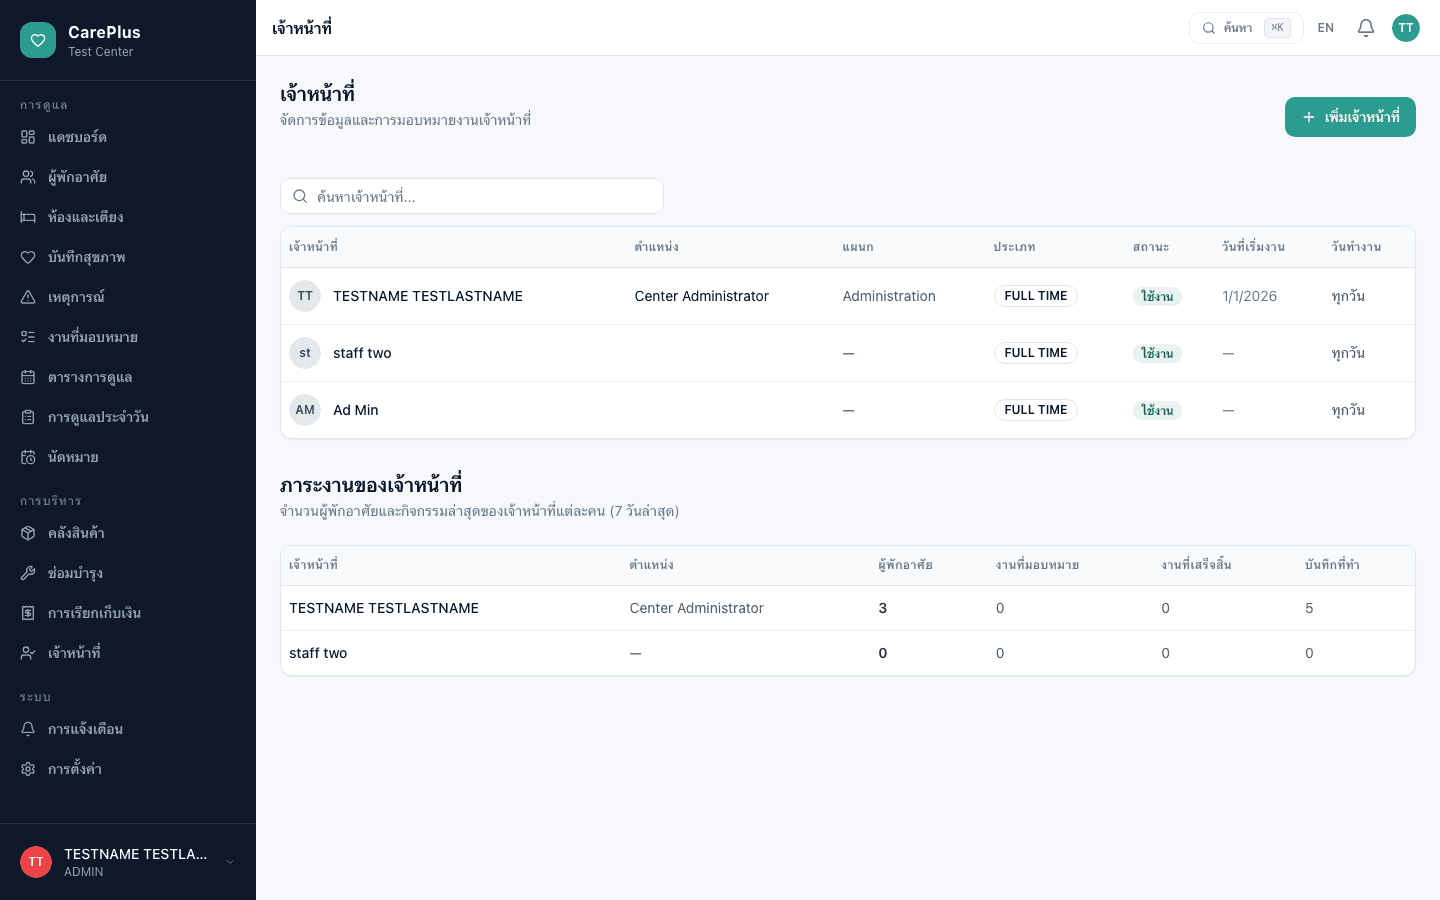
โมดูลพนักงานจัดการข้อมูลบุคลากรทั้งหมด ตำแหน่ง แผนก ประเภทการจ้างงาน และวันที่เริ่มงาน สามารถดูรายละเอียดพนักงานแต่ละรายและเพิ่มพนักงานใหม่ได้ (ADMIN เท่านั้น)
English
The Staff module manages all personnel information including position, department, employment type, and hire date. Staff profiles can be viewed and new staff added (ADMIN only).
ขั้นตอนการใช้งาน · Step-by-step
- 1
ดูรายชื่อพนักงานพร้อมตำแหน่ง แผนก และประเภทการจ้าง
View the staff list with positions, departments, and employment types.
- 2
ส่วน "ภาระงาน (Caseload)" แสดงว่าเจ้าหน้าที่แต่ละคนดูแลผู้พักอาศัยกี่คน และทำงาน/บันทึกไปเท่าไหร่
The "Caseload" panel shows how many residents each staff member covers and their tasks/records.
- 3
คลิกชื่อพนักงานเพื่อดูโปรไฟล์ละเอียด และกด "+ เพิ่มพนักงาน" เพื่อลงทะเบียนใหม่ (ADMIN)
Click a staff member's name for their profile, or "+ Add Staff" to register one (ADMIN only).
- 4
ประเภทการจ้าง: ประจำ / พาร์ทไทม์ / สัญญาจ้าง
Employment types: Full-Time / Part-Time / Contract.
14. การเงินและใบแจ้งหนี้
Billing & Invoices
ภาษาไทย
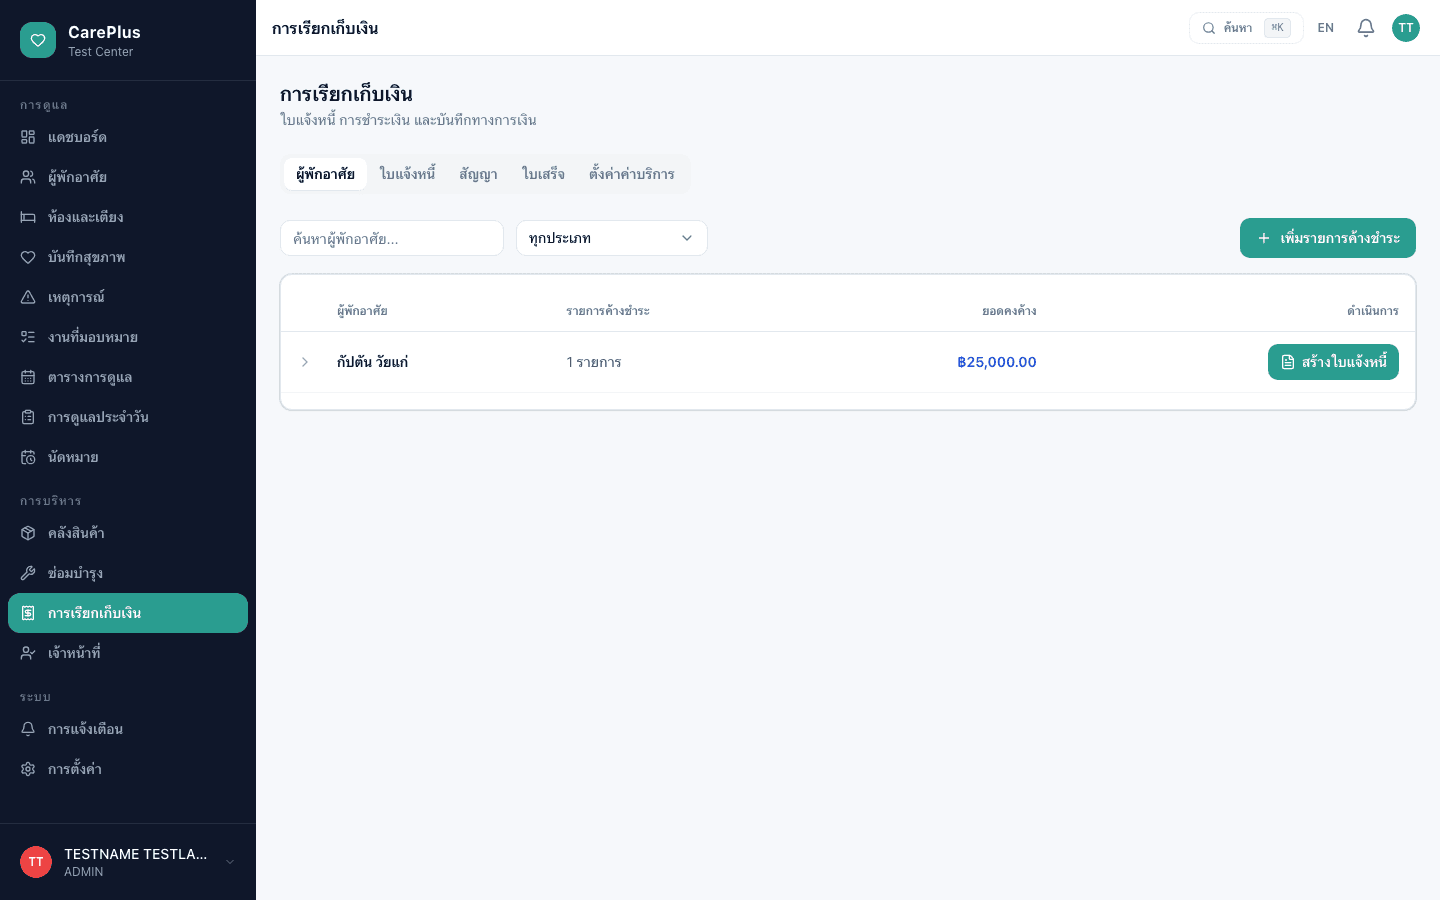
โมดูลการเงินออกแบบให้ดูตามผู้พักอาศัย: แท็บ "ผู้พักอาศัย" แสดงยอดค้างของแต่ละคนและสร้างใบแจ้งหนี้ได้คลิกเดียว มีแท็บ ใบแจ้งหนี้ / สัญญา / ใบเสร็จ รองรับใบกำกับภาษี VAT 7% อัตโนมัติ และสัญญาบริการที่สร้างยอดเรียกเก็บรายเดือนพร้อมเตือนใกล้หมดอายุ
English
The Billing module is resident-centric: the "Residents" tab shows each person's outstanding balance and lets you create an invoice in one click. Tabs cover Invoices / Contracts / Receipts, with automatic 7% VAT tax invoices and service contracts that generate monthly charges and expiry reminders.
ขั้นตอนการใช้งาน · Step-by-step
- 1
แท็บ "ผู้พักอาศัย": ดูยอดค้างของแต่ละคน แล้วกด "สร้างใบแจ้งหนี้" เพื่อออกใบทันที
Residents tab: see each person's balance, then click "Create Invoice" to issue one instantly.
- 2
แท็บ "สัญญา": สร้างสัญญาบริการ (แพ็กเกจ ค่าบริการ มัดจำ วันเรียกเก็บ ต่ออายุ)
Contracts tab: create service contracts (package, fee, deposit, billing day, renewal).
- 3
เมื่อรับชำระเงิน ระบบออก "ใบเสร็จ" อัตโนมัติพร้อมเลขที่รันต่อเนื่อง — ดูได้ที่แท็บใบเสร็จ
On payment, a numbered "Receipt" is auto-issued (see the Receipts tab).
- 4
เปิด VAT ในการตั้งค่าศูนย์ ระบบจะคำนวณ VAT 7% บนใบกำกับภาษีให้อัตโนมัติ
Enable VAT in center settings and the system computes 7% VAT on tax invoices automatically.
15. คลังสินค้า
Inventory Management
ภาษาไทย
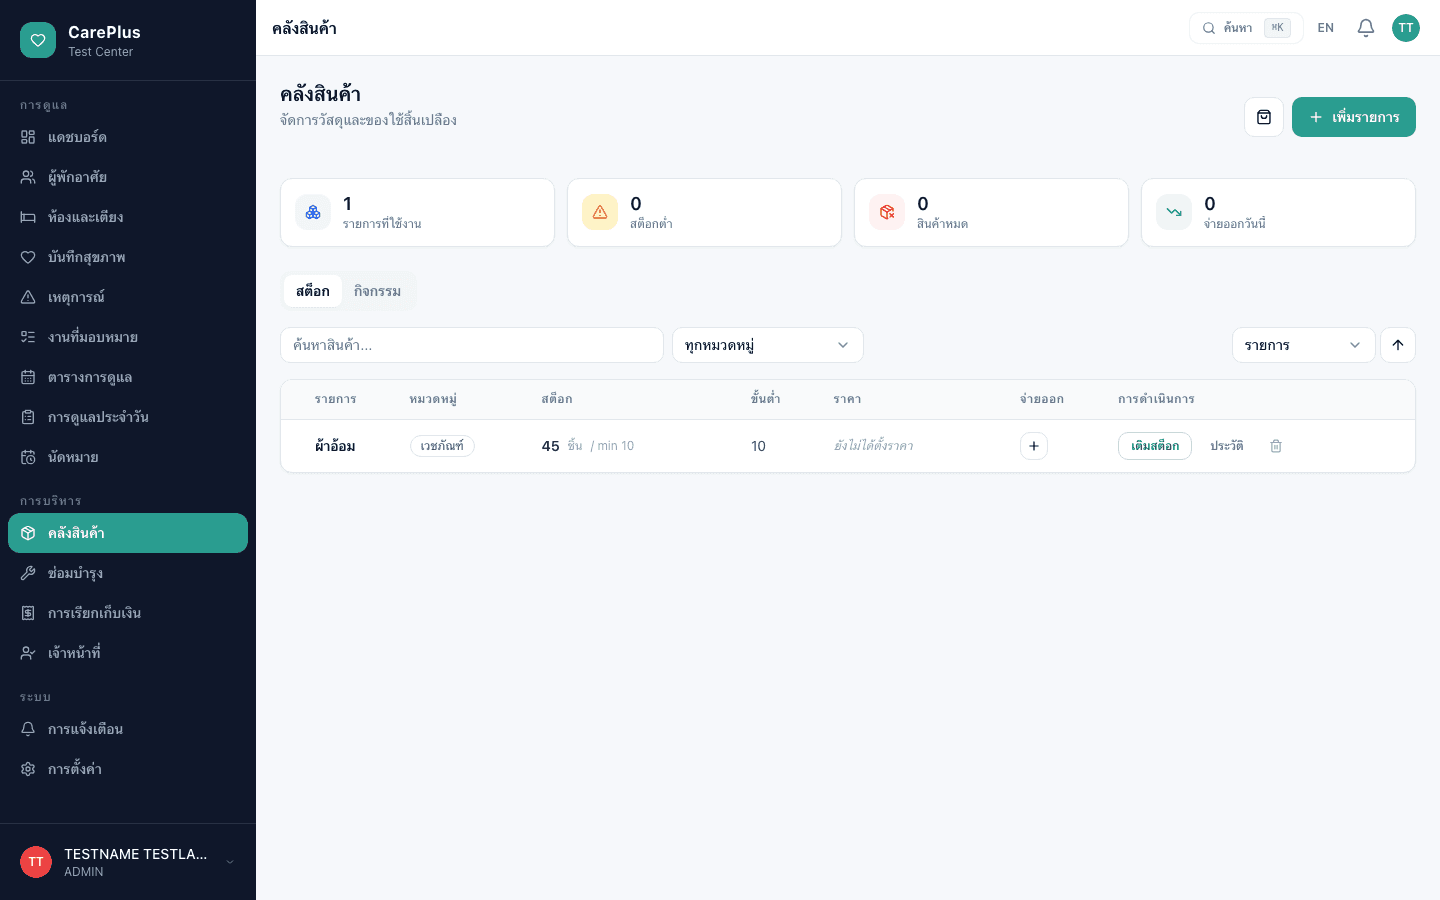
โมดูลคลังสินค้าจัดการวัสดุและอุปกรณ์ทั้งหมดในสถานดูแล แบ่งตามหมวดหมู่ เช่น อุปกรณ์การแพทย์ ของใช้ส่วนตัว อาหาร อุปกรณ์ทำความสะอาด และเครื่องมือ พร้อมระบบแจ้งเตือนเมื่อสต็อกต่ำ
English
The Inventory module manages all facility supplies and equipment by category (Medical, Personal Care, Food, Cleaning, Equipment). Low stock alerts notify staff when items need restocking.
ขั้นตอนการใช้งาน · Step-by-step
- 1
เลือกหมวดหมู่จากแถบกรองเพื่อดูสินค้าเฉพาะกลุ่ม
Select a category from the filter bar to view specific item groups.
- 2
คลิกรายการสินค้าเพื่อดูประวัติธุรกรรมและรายละเอียด
Click an item to view transaction history and details.
- 3
กดปุ่ม "เติมสต็อก" เพื่อเพิ่มจำนวนสินค้า
Click "Restock" to add items to inventory.
- 4
กดปุ่ม "เบิกใช้" เพื่อบันทึกการนำสินค้าออกไปใช้
Click "Deduct" to record items taken out for use.
16. งานซ่อมบำรุง
Maintenance
ภาษาไทย
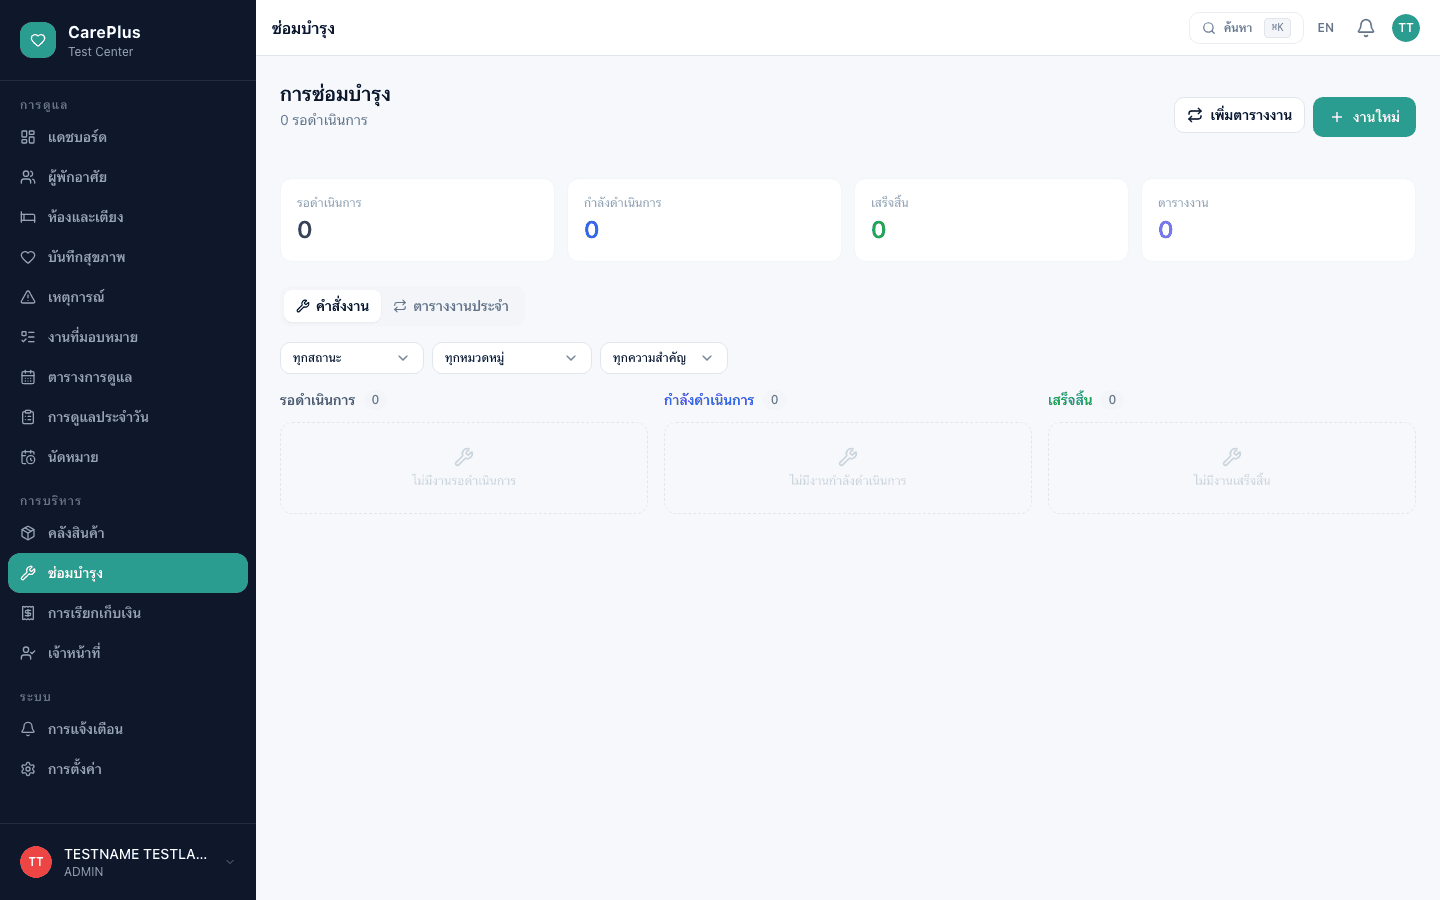
โมดูลซ่อมบำรุงจัดการงานบำรุงรักษาทั้งแบบตามกำหนดและแบบเร่งด่วน ครอบคลุมหมวดหมู่ต่างๆ เช่น ระบบปรับอากาศ ระบบน้ำ ระบบไฟฟ้า และงานทำความสะอาด พร้อมกำหนดระดับความสำคัญ
English
The Maintenance module manages scheduled and reactive maintenance tasks, covering HVAC, plumbing, electrical, and cleaning categories, each with configurable priority levels.
ขั้นตอนการใช้งาน · Step-by-step
- 1
ดูรายการงานซ่อมบำรุงทั้งหมดพร้อมระดับความสำคัญและหมวดหมู่
View all maintenance tasks with their priority levels and categories.
- 2
ระดับความสำคัญ: ต่ำ / ปานกลาง / สูง / เร่งด่วน
Priority levels: Low / Medium / High / Urgent.
- 3
กดปุ่ม "+ สร้างงานซ่อมบำรุง" เพื่อแจ้งงานใหม่
Click "+ Create Task" to report a new maintenance request.
- 4
อัปเดตสถานะงานเมื่อดำเนินการเสร็จสิ้น
Update the task status when work is completed.
17. การแจ้งเตือน
Notifications
ภาษาไทย
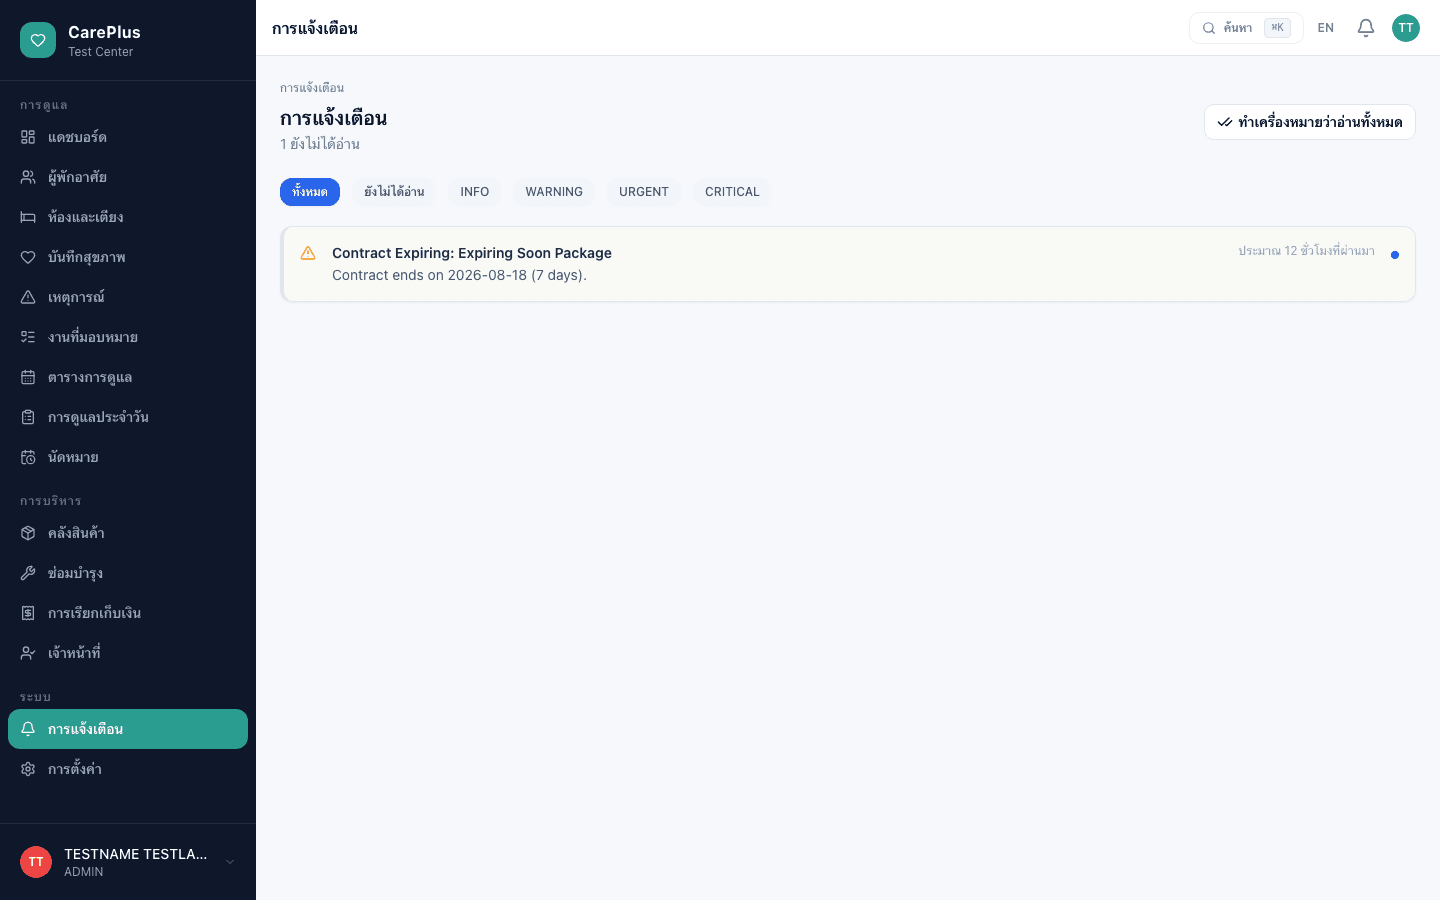
ศูนย์การแจ้งเตือนรวบรวมการแจ้งเตือนทุกประเภทจากทั่วทั้งระบบ ตั้งแต่สัญญาณชีพผิดปกติ สต็อกต่ำ ไปจนถึงเหตุการณ์ฉุกเฉิน สามารถกรองตามระดับความรุนแรงและทำเครื่องหมายว่าอ่านแล้วได้
English
The Notification Center aggregates all system alerts, from abnormal vitals and low stock to critical incidents. Notifications can be filtered by severity and marked as read.
ขั้นตอนการใช้งาน · Step-by-step
- 1
คลิกไอคอนกระดิ่ง 🔔 ในแถบด้านบน หรือไปที่เมนู "การแจ้งเตือน"
Click the 🔔 bell icon in the top bar, or navigate to the "Notifications" menu.
- 2
กรองตามระดับ: ข้อมูล / คำเตือน / เร่งด่วน / วิกฤต
Filter by level: Info / Warning / Urgent / Critical.
- 3
คลิกการแจ้งเตือนเพื่อทำเครื่องหมายว่าอ่านแล้ว
Click a notification to mark it as read.
- 4
กดปุ่ม "ทำเครื่องหมายทั้งหมดว่าอ่านแล้ว" เพื่อล้างการแจ้งเตือนทั้งหมด
Click "Mark All as Read" to clear all notifications at once.
18. การตั้งค่าระบบ
System Settings
ภาษาไทย
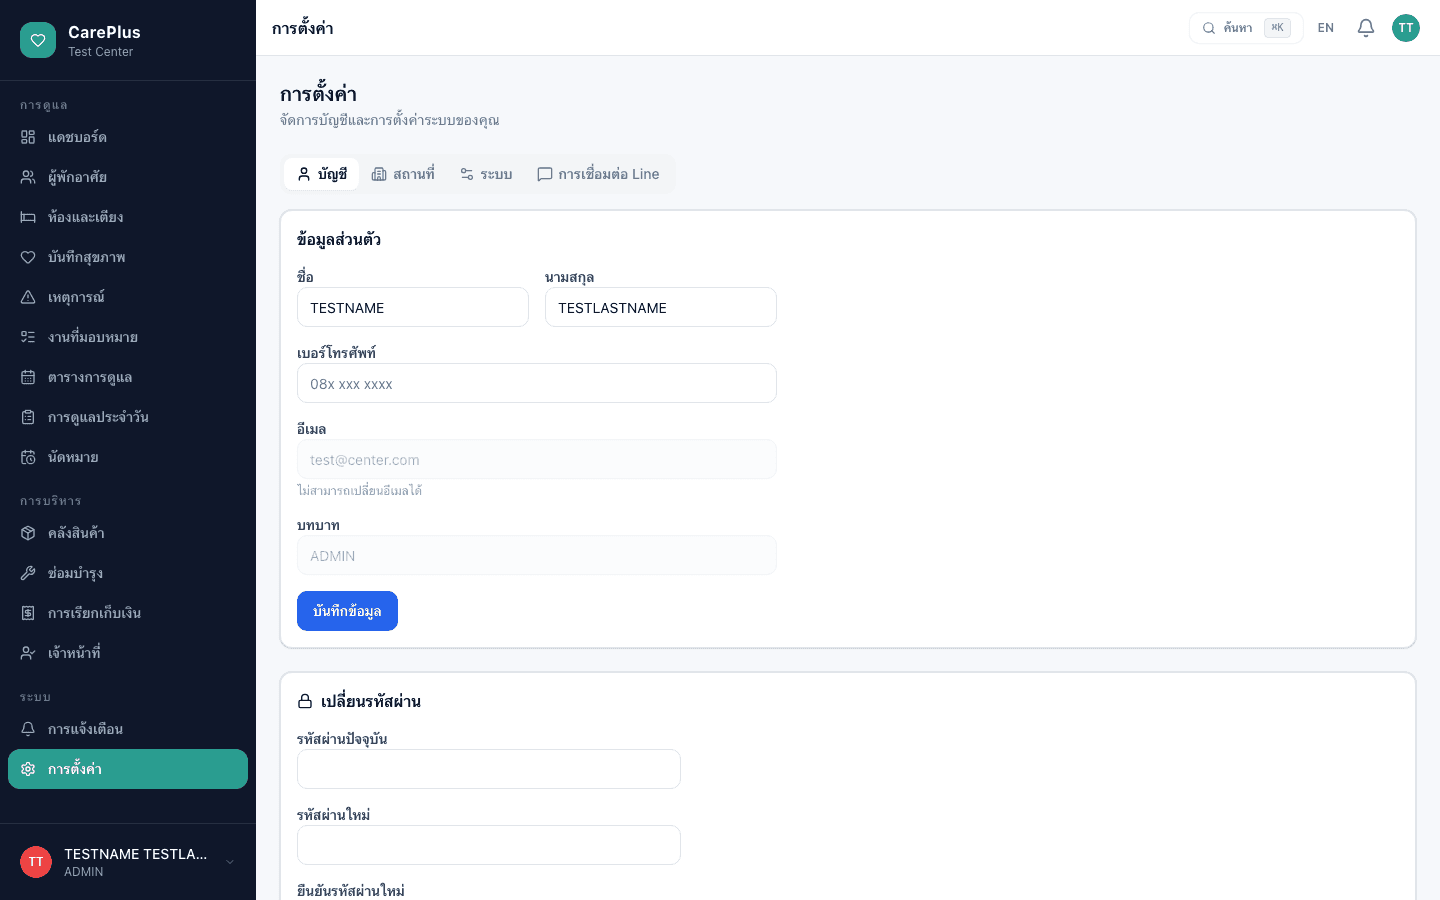
หน้าตั้งค่า (สำหรับ ADMIN เท่านั้น) ช่วยให้ผู้ดูแลระบบจัดการข้อมูลโปรไฟล์ ข้อมูลสถานดูแล เกณฑ์การแจ้งเตือน การกำหนดหมายเลขเอกสาร และการเชื่อมต่อ LINE สำหรับส่งข้อความแจ้งเตือน
English
The Settings page (ADMIN only) manages profile information, facility details, notification thresholds, document numbering, and LINE integration for automated alert messaging.
ขั้นตอนการใช้งาน · Step-by-step
- 1
แท็บ "โปรไฟล์": แก้ไขชื่อ เบอร์โทร และเปลี่ยนรหัสผ่าน
Profile tab: Edit name, phone number, and change password.
- 2
แท็บ "สถานดูแล": ดูข้อมูลสถานดูแล แผนการใช้งาน และขีดจำกัดการใช้งาน
Facility tab: View facility info, plan tier, and usage limits.
- 3
แท็บ "ระบบ": กำหนดเกณฑ์การแจ้งเตือนและรูปแบบหมายเลขเอกสาร
System tab: Configure notification thresholds and document numbering.
- 4
แท็บ "LINE": เชื่อมต่อบัญชี LINE สำหรับส่งการแจ้งเตือนอัตโนมัติ (แผน PRO ขึ้นไป)
LINE tab: Connect a LINE account for automated alert messages (PRO plan and above).
19. สิทธิ์การใช้งานตามบทบาท
Role-Based Permissions
ภาษาไทย
ระบบ CarePlus มีสองบทบาทหลัก: ADMIN (ผู้ดูแลระบบ) ซึ่งมีสิทธิ์เข้าถึงทุกฟีเจอร์ และ STAFF (พนักงาน) ซึ่งมีสิทธิ์เข้าถึงฟีเจอร์ที่จำเป็นสำหรับการดูแลผู้พักอาศัย
English
CarePlus has two main roles: ADMIN with full system access, and STAFF with access to features required for resident care.
| ฟีเจอร์ / Feature | ADMIN | STAFF |
|---|---|---|
| แดชบอร์ด / Dashboard | ✓ | — |
| ผู้ช่วยเสียง AI / AI Voice Assistant | ✓ | ✓ |
| ดูผู้พักอาศัย / View Residents | ✓ | ✓ |
| เพิ่ม/แก้ไขผู้พักอาศัย / Add/Edit Residents | ✓ | — |
| ห้องและเตียง / Rooms & Beds | ✓ | ✓ |
| จัดการห้อง / Manage Rooms | ✓ | — |
| ตารางการดูแล / Care Schedule | ✓ | ✓ |
| การดูแลประจำวัน / Daily Care | ✓ | ✓ |
| ดูยา / View Medications | ✓ | ✓ |
| จัดการ/บริหารยา / Manage & Administer Meds | ✓ | — |
| บันทึกสุขภาพ / Health Records | ✓ | ✓ |
| นัดหมาย / Appointments | ✓ | ✓ |
| เหตุการณ์ / Incidents | ✓ | ✓ |
| ภารกิจดูแล / Staff Tasks | ✓ | ✓ |
| คลังสินค้า / Inventory | ✓ | ✓ |
| เบิก/จ่ายสินค้า / Dispense Inventory | ✓ | ✓ |
| ซ่อมบำรุง / Maintenance | ✓ | — |
| การเงิน / Billing | ✓ | — |
| พนักงาน / Staff Management | ✓ | — |
| จัดการผู้ใช้ / User Management | ✓ | — |
| ตั้งค่าระบบ / Settings | ✓ | — |
20. เคล็ดลับและการแก้ปัญหา
Tips & Troubleshooting
คำถามที่พบบ่อย · Common Questions
ไม่เห็นเมนูบางรายการ → ตรวจสอบสิทธิ์การใช้งานกับผู้ดูแลระบบ
Don't see a menu item → Check your role permissions with your administrator.
ไม่เห็นปุ่มไมค์ผู้ช่วยเสียง → ใช้ Chrome หรือ Edge และตรวจว่าเปิดใช้งาน AI แล้ว (ปุ่มจะซ่อนบนเบราว์เซอร์ที่ไม่รองรับ)
No voice mic button → Use Chrome or Edge and ensure AI is enabled (the button is hidden on unsupported browsers).
ผู้ช่วยเสียงไม่ได้ยิน → กด "อนุญาต" การใช้ไมโครโฟนในเบราว์เซอร์ และพูดหลังปุ่มเปลี่ยนเป็นสีแดง
Voice assistant not hearing you → Allow microphone access in the browser and speak after the button turns red.
ลืมรหัสผ่าน → ติดต่อผู้ดูแลระบบ (ADMIN) เพื่อรีเซ็ตรหัสผ่าน
Forgot password → Contact your ADMIN to reset your password.
ต้องการเปลี่ยนภาษา → กดปุ่ม EN/TH ที่หน้าเข้าสู่ระบบ
Change language → Press the EN/TH button on the login page.
ข้อมูลไม่อัปเดต → รีเฟรชหน้าเว็บ (F5 หรือ ⌘R)
Data not updating → Refresh the page (F5 or ⌘R).
แจ้งเตือนสต็อกต่ำ → ไปที่โมดูลคลังสินค้าและกด "เติมสต็อก"
Low stock alert → Go to Inventory module and click "Restock".
ระบบช้าหรือค้าง → ปิดแท็บอื่นๆ และล้างแคชเบราว์เซอร์
System slow or freezing → Close other tabs and clear browser cache.
พร้อมเริ่มต้นใช้งาน?
ติดต่อผู้ดูแลระบบของสถานดูแลของคุณ หรือสมัครทดลองใช้งานฟรีวันนี้